Saturday, October 1, 2011

BongBongGiay400x278.jpg 
Simple folded paper circles are glued together to create a fun globe. Decorate with paper globe topiary or make several globes and thread on to a length of embroidery silk or thin wire to make a garland. 
http://images.thriftyfun.com/images/articles45/BongBongGiay400x611.jpg

Supplies:

  • assorted patterned papers
  • glue stick
  • 2 inch circle punch
  • pencil
  • craft knife

Instructions

Cut or punch 20 circles on to the paper. Cut out a triangle from cardstock. Place the triangle pattern in the center of each circle and lightly draw around with a pencil to make the score lines. Score along the lines using the back of the craft knife blade.
BongBongGiay400x297.jpg
Lay the circles flat and gently fold up the flaps. Create top and bottom: With glue stick, glue flaps of 5 pieces together to make a dome. Repeat for globe bottom.
BongBongGiay400x301.jpg
Create middle band: Glue remaining 10 circles together. Glue first piece to last piece to form band.
BongBongGiay400x253.jpg
Glue globe top to globe band. Glue globe bottom to other side of globe band to form ball.
BongBongGiay400x278.jpg
To create paper globe topiary: Cut 3/16 inch hole at center of one paper circle to allow for topiary pole. Paint 3/16 inch dowel with apple green acrylic paint.
Cut floral foam to fit into pot. Insert covered dowel into hole in paper globe. Insert dowel into center of foam. Cover pot with crumpled strips of tissue paper.
Tie ribbon bow around dowel at base of paper globe.
Craft Project for kids: Paper Globe tutorial

Tuesday, September 27, 2011

pomander ballswm
As promised, I have another project to share with you today from the recent makeover of our daughter’s room.  I hope you are not getting tired of all the decorative kissing balls {like these tissue paper rosettes and the felt kissing balls} that I have been sharing lately.  With Valentine’s Day and three daughters…well, that explains it…right?
pomander ball 9wm 

These adorable kissing balls are not my creative genius…I wish I could claim them because they are really fun and springy.  These beauties are the creation of Paula of Frog Prince PaperiePaula shared her tutorial for how to make them over at Pizzazzerie.
pomander traywm
But before I made the pomanders…I had to make a tray to hold them in.  I found this little gem at the Thrift Store {DI} for .75 cents.  Yep!  I loved the shape and the two side edges of the wooden tray.
pomander ball 1wm
I added a fresh coat of white Krylon Spray Paint…and  sanded a few edges to give it some character.  Doesn’t it look so pretty? 
Then I took a piece of scrapbook paper and cut it to fit into the bottom of the tray.  Then I covered the bottom with a Matte Mod Podge and then let it dry.  Then I added a layer of Mod Podge to the top.
pomander ball 2wm
When I looked for ball head pins, I could not find one single package of pins that were not multicolored.  I saw some pearl pins in the wedding aisle, but they were a bit too expensive for my budget.  So I simply took a pack of pins I already had on hand and spray painted them white.  Spray paint is your friend :)!
pins paintedwm
This was just after one coat.  Make sure to wear a glove and then move the pins around as you spray to get the pins at all angles.  It took three coats to cover them completely.  Next time…I will push the pins almost all the way into the styrofoam so that paint does not get on the pin itself.  It will make it easier to push into the ball. 
pomander ball 12wm
My daughter’s begged to help out with the next steps and I gladly welcomed their help.  They took turns punching and folding up the petals for the top flowers.  They also took turns getting the pins and putting them into the flowers.  We place a flat flower first and then a folded flower.
 pomander ball 11wm
Then the girls would set the pinned flowers in a pile and I pinned them into the styrofoam ball.  It was a really fun girly activity to do together. But they are a bit time consuming. Watch a chick flick and grab a friend to help you. Each ball took about one hour with my little helpers!
 pomander ball 7wm
Pretty easy right?
pomander ball 8wm
I really like how they turned out and they bring some fun color into my daughter’s bedroom.
Beau tiful paper flowers: DIY Pomander "Kissing Balls"

Monday, September 26, 2011

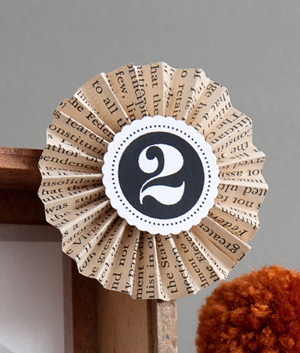
Book Page Medallion Craft

This craft is part of the 13 Days of Halloween project. Download number templates for the project, as well as the bug template for Day 3, in the tips and supplies post. Links to all of the crafts from this project can be found in the main 13 Days of Halloween post.
Medallions, rosettes, accordion fold circles … whatever you call them, they’re a neat detail that you can use as everything from ornaments to gift embellishments. I love the look of old book pages in this craft, but you can use any paper that you’d like. I would recommend a text weight paper, as opposed to cardstock, since it’s easier to bend and fold.
 Recycling paper:  How to Make Book Page Medallions / Rosettes

Book Page Medallions

Supplied Needed
a book page or pages
a ruler
a pencil
a hot glue gun
a 1″ circle or square of cardstock
glue dots or double-sided tape


Instructions
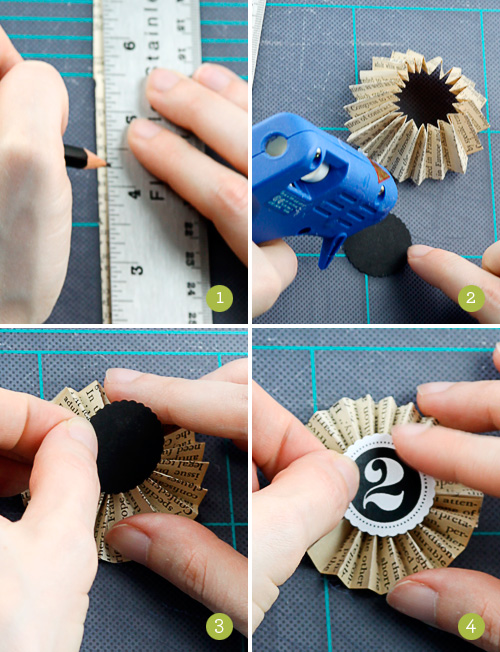
1. Cut a 1″ wide by 11 1/2″ to 12″ long strip from the book page. You may have to use multiple strips, which you can connect together using glue dots or double-sided tape. Lay the strip flat, and using a ruler and pencil, mark the edge of the paper every 1/4″.
2. Fold the paper in an accordion fold, using the pencil marks as your guide. When finished, connect the two loose ends together using glue dots or double-sided tape, forming a circular shape. Add hot glue to a 1″ circle or square of cardstock.
3. Immediately place the piece of cardstock over the center of the back side of the medallion. Hold in place (watch your fngers – that glue is hot!) for 30 seconds or so, until the glue begins to cool and the cardstock is firmly attached.
4. Add the calendar number to the front of the medallion using glue dots or double-sided tape.

Wednesday, September 21, 2011

Paper crafts for kids: MAKE YOUR OWN ENVELOPES, origami tutorial

You will need:
An existing envelope, (any shape and size you wish).
Your favourite HB pencil
Coloured card, (you could have each one a different colour if you like).
An inlay sheet, printed from the downloadable template
Spray glue, double-sided tape and scissors.
Step 1: Firstly gently undo the glued sides of an existing envelope, careful not to tear them and cause too much damage. Lay the template flat on to some coloured card of your choosing and trace around the shape with a  pencil then cut out.
Step 2 + Step 3:
Carefully fold in the bottom and two side corner flaps of your new envelope to give it the basic shape. Leave the top one flat as this will be easier to trace when placed onto your inlay paper. With a pencil trace around your envelope shell onto your downloaded inlay paper and cutout. You will now have the exact size of the outer side of the envelope. This is not ideal as it will be too snug when the sides of the envelope are folded in so the inlay needs to be trimmed.
Step 4:
With a pencil and ruler mark about a 3 mm border from the edge at small increments all the way around the inlay. Then with a pair of scissors carefully follow the guide you have made and cut off the 3mm border.   Trim any rounded corners to neaten.
Step 5:
Place the inlay against the base of the envelope and check if you are happy with the size and border/rim shown by the envelope. Spray glue and return to the envelope, centering the inlay by lining it up with the bottom fold of the envelope. For a smooth and solid finish run your hand over it to eliminate any bubbles that could appear left between the inlay and the envelope.
Step 6:
Gently fold all the sides of the envelope back together again including the top flap and make sure you get a clear, crisp fold on all the edges. Use your double-sided tape to stick town the sides with the bottom flap.
Step 7:
With some white ink and a calligraphy pen, write your desired address and adorn with some pretty stamps and whatever else you like and it’s ready to go.
Cute aren’t they?!  I love how you could really personalise the liner to match your day!  How about using old comic book pages for a quirky retro wedding? Or maps for a travel themed celebration?  You could use old book or newspaper pages for a literary-inspired invite, or if you’re not worried about fraying edges how about trying it out with fabric?  What would you use to match your wedding?!
Paper crafts: fun favour boxes fubumedia
Hey lovely people! You know it’s Thursday right?  Yup, that means we’re back with another cracking DIY project for you today! Woop!
The lovely Fanni over at Fubumedia has been beavering away on this fun little idea to share with us today.  A cute and unique favour box, just big enough to squeeze a couple of your favourite treats into as a delicious thank you for your guests.
 As with all our projects, it’s pretty simple, all you need to do is print the free templates, and get sticking!

You will need:
1 x favour box template
1 x thank-you flag template
2 x sheets A4 card (you could use complimentary colours to add an extra bit of pizzazz when your guests open the box!)
A pair of sharp scissors
Pencil
Cocktail sticks or toothpicks
Ribbon to coordinate with your wedding colours
Method:
Dowload and print the templates, and cut out the favour box template.  Glue the two pieces of card back-to-back and then cut out the box shape using the template
Once you have the shape, fold all the little strips inwards, place your favours in the middle, and pinch all the strips together at the top before securing with a little bit of tape.  Cover the tape by tieing a pretty piece of ribbon in your wedding colours
Cut out the ‘thank-you’ banners, snipping one end in a ‘v’ shape to make a flag.  Roll the other end around a cocktail stick an secure with a bit of tape.  Gently push your flag into the top of your box…
and voila!  Cute little DIY favour boxes that your guests will love!

etiqueta 01   
Unique cards for kids: Printable Monkey Tags and cards

etiqueta 02
Paper crafts monkey garland  for holiday and birthday for kids

tags 03
Add an Imagemonkey tags para imprimir
Just save the inage as with the right button of your mouse to your computer
http://weddingsparrow.files.wordpress.com/2011/05/pom_poms_02.jpg


Paper crafts:  Making Pom-Poms flowers for holiday decorating
Here’s what you’ll need:
  • tissue paper
  • thin beading wire
  • scissors
Here’s what you do:
  1. Cut 6 to 8 small sheets of tissue paper. The width of the sheets should be a little more that the desired diameter of the pom-pom.
  2. Make 1-centimeter accordion folds, taking care to firmly crease each fold.
  3. Cut a piece of wire, about 10 centimeters or longer, depending on what you plan to use the pom-pom for.
  4. Slip the wire over the center of the folded paper and twist together.
  5. Snip each end of the folded paper into a point or a curve.
  6. Peel up and fan out each layer of tissue paper, one at a time.
  7. Arrange the layers to the desired shape.

These are nice and easy if you are making just a small handful of them, but if you have to make a huge bunch for your wedding, you might want to share the load with some friends. Invite them over for a pom-pom-making party. Serve puffy things like profiteroles and doughnut holes and make some pom-poms!”


Recycling paper and arts: 9 Incredible Book Sculptures


Some folks freak out everytime they see some traditional form of media made into something else - books, vinyl records, and the like. As someone who has altered these things into many a how-to project, I constantly recieve comments about how "sad it is that books are no longer valued" or "instead of ripping up albums, try listening to them." Folks, my entire home is filled with books. And records. And lots of old furniture, plenty of heirlooms, and even a few cassette tapes. I get it. But, not all old things are worth saving.
Or, better yet, sometime a thoughtful transformation proves the everlasting value of historic media. Honors it in a unique way that doesn't say, "This is old, so I'm gonna turn it into something else," but "this is awesome, and I want it to participate in a work of art, or be echoed throughout my home."


On that note, GammaSquad has assembled nine seriously awesome book sculptures. I know there are lots more of these out there.

Carnation boutonnieres made from cupcake liners are easy to make and kids love them.
Perfect for St. Patrick's Day.
To make these, I find that the king-size cupcake liners work the best. I got mine in the baking supply aisle at Jo-Ann's.
Flatten out cupcake liner.
Fold liner in half.
Fold into 4th, 8ths and then 16ths.
Twist the bottom into a point.
Using floral stem wrap tape (available in the floral supply section of any craft store), wrap the stem of your boutonniere.
Fan out the top.
Create the look of petals by cutting into the paper.
To add color, I painted my flower with watercolor paint.

Tie stem with ribbon and add a safety pin.
nghe nhạc trực tuyếnNấu món chay | học nấu ăn DJ - Ảnh đẹp | xalotinnhanh