Friday, August 7, 2015

Hi, wanted to show you the base of my blue stone nail art so here it is! As I've mentioned I did a version f the saran wrap technique and dabbed about two times with both the colors, on the blue base. Really happy with these. ^^


Polishes used:
Look Ever - 22, swatch
Essence - Black Is Back

Friday, July 31, 2015

Time for my 4th post for this months Nail Challenge Collaborative theme 
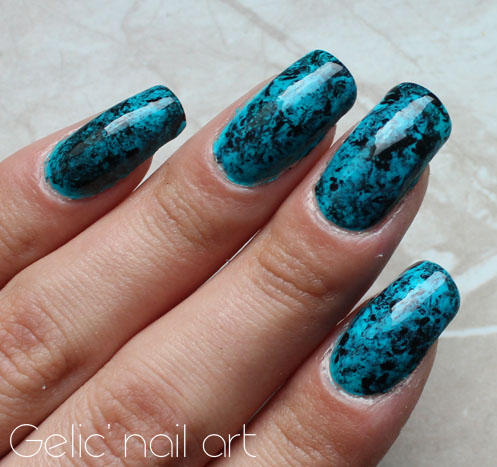
Travel. For some years ago I was to Dominican Republic, it was a nice place but what I aiming for is that there is a special stone which they call Larimar, it's blue with white veins.  I kinda remembered them as blue and went on with my plans of making this nail art, and in my memory the veins was black. So when I googled it was too late to change plans, and I really like this end result.

So, more about the nail art. I used a bright blue color, then I used the Saran Wrap technique multiple times (tutorial is in the section above). First black on top of the blue, then blue again to create a marble stone like look. I freehanded the black arrow shape and white lines and placed these Born Pretty Store's blue stone imitation rhinestones. This manicure was hard to get color accurate, since the blue was too bright for my camera, and brighter than below, but did my best to edit the color correctly. Hope you'll like them as much as I did. :)


Polishes used:
R de L Young - Black
R de L Young - White
Look Ever - 22
Essence -
Born Pretty Store nail art stone imitation rhinestone the itemID: 20634 .(http://www.bornprettystore.com/flatback-cute-nail-decoration-round-water-drop-studs-nail-p-20634.html)

So this nail art wheel contains 4 colors of stone imitation rhinestones made out of plastic. The colors are white, blue, red and green which all have black stone like veins/marble look. Each color also comes in 3 different types, round, tear drop and oval. All the decorations are pretty big so I'd recommend them for accent nails like I've done above. I attached mine with nail glue because of their size and they sit nicely on the nail, wear ability wise they lasted well and after 3 days (which include me moving out/cleaning out an apartment) only the right hand's decoration show some slight wear. They're available for $3.52 and you can use my 10% discount code on that price. And as usual BPS has free world wide shipping.


Saturday, January 31, 2015

I guess I'm cutting it short showing you the last of the four theme challenges post the 31st of January, but that still counts. ;) As you might know by now I've joined the nail challenge collaborative where we show four nail art's according to a specific theme each month.

This month the theme is wallpaper and as I said in my first post I decided to do a little "history lesson", doing my nail art's inspired by the wallpaper/interior designs of certain decades, going back in time. My last post was inspired by the 50s and today I'm showing a 30s wallpaper nail art.

Source 1 (refrigerator), Source 2 (yellow roses), Source 3 (pink roses)

I decided to skip the traditional art deco style which also was popular during the 30 and fell for these rose patterns. I decided for a gray base where I did a saran wrap with two gray polishes. Then I freehanded yellow roses. As the middle picture I decided for orange shadows in the roses and I also drew some leaves. Basically I'm pretty happy with the result, it looks like a painting in some ways because it's not so detailed. Also, much as a wallpaper I think it look the best from a distance, when I'm looking really close I think it looks weird. :P


Polishes used:
La Femme (gray)
KIKO - 329 (light gray)
KIKO - 368 (orange)
Essence - Love Is In The Air
Jordana Pop Art - Contemporary White


Tuesday, December 2, 2014

Today is the first theme of Winter Nail Art Challenge; Christmas Lights/candles. This first theme really sets the tone of this nail art challenge, it's more of a Christmas challenge than a winter challenge, when you think about it. :)

Even though it's December, it's way too early for me to have any "Christmas spirit" and I guess that influenced my nail art a bit, but maybe that's not a bad thing? Basically what I have for you is a Saran Wrap (which I have a tutorial for HERE) and on top of that some simple free hand nail art. Hope you like it. :)


Polishes used:
Jordana Pop Art - Black Mark
Jordana Pop Art - Contemporary White
Kleancolor - White
La Femme (gray)
Adena - no. 51
Heart shaped green bottle (probably Etude House?!)
Nordic Cap - NP09 (red)
Nordic Cap - NP21 (blue)
Claire's matte nail polish

Sunday, November 30, 2014

Can't believe that it's almost December, in Sweden we "celebrate" 1st Advent today, ie. lightning the first out of four candles four Sunday's before Christmas. Do you have that or something similar where you come from, you international readers? :)

My nail art for Nail Art Sunday isn't "Christmassy" however, more like gothic nail art in my eyes, being purple and black, in a Saran Wrap nail art. And heads up, there will be a tutorial of this during this week. Also Winter Nail Art Challenge begin soon. :) Let me know what you think. :)

Looks awesome in the sun!


Polishes used:
Kleancolor - Neon Purple
Nordic Cap - NP12

Friday, September 12, 2014

Marbled swimming pool stripes by @chalkboardnails

I like stripes. I do them quite a bit, often freehand (a girl's gotta practice), but today's 31 Day Challenge nail art required the use of nail vinyls. I combined them with the saran wrap marble technique for a blocked, marbled look that reminds me of a swimming pool. Steph Stone did a swimming pool nail art tutorial recently that used the same technique for the aquatic effect. Let's dive in!

Marbled swimming pool stripes by @chalkboardnails

Nail polishes used:
LVX Cashmere
JINSoon Cool Blue
Straight nail vinyls

I painted my nails with two coats of Cashmere and added a layer of quick dry topcoat to speed up the drying process. Once the base was dry, I applied both Nail Vinyls brand straight vinyls and KBShimmer straight vinyls with random spacing. The reason I used two different brands was they each had different sizes I wanted to use -- the smallest stripes are from Nail Vinyls while the medium and large blocks are from KBShimmer.

I painted one thicker coat of Cool Blue over the top, and then dabbed wadded up pieces of saran wrap over the wet, freshly painted polish. This removed some of the blue and left it with a cool tie-dye marble effect! The only thing left to do was remove the vinyls and finish with topcoat.

Marbled swimming pool stripes by @chalkboardnails

Stripes all day:

Monday, March 31, 2014

I'm behind with the 31dnc and I got a lot to do. But here I have no 30, "inspired by a tutorial". I decided to try something new to me and my choice fell on "saran wrap nail art". I thought that a combo of red and black would look cool. I took red as base and then black on top and the technique was fun and simple so I'll definitely do it more times. I also decided to add a 3MM square metal stud from Born Pretty Store on each nail and I think the result feel a bit gothic. :D


Bonus pic in the sun :)

Polishes and materials used:
Claudia - 607

Nordic Cap - NP12
3MM square metal studs (gold)  Click the link to get to my original review for Born Pretty Store.

***Some products in this post have been provided for review***
nghe nhạc trực tuyếnNấu món chay | học nấu ăn DJ - Ảnh đẹp | xalotinnhanh