Monday, September 7, 2015

Encircled black and white nail art by @chalkboardnails

Black and White day of the 31 Day Challenge is always my favorite, because everyone’s nail art always looks so striking. There’s something just so magnetic about black and white as a pair, isn’t there?

Encircled black and white nail art by @chalkboardnails

I didn’t have any particular inspiration for this nail art, but I did know that I wanted to do white patterning on a black base. I started out with two coats of Orly Liquid Vinyl, and then used my trimmed town super skinny striper brush to add on some arcs and circles with Formula X White Matter. Thin lines were a priority for me this time, so if my white lines got too fat in any areas, I went back in with black and thinned them down. 

I added a coat of quick dry glossy topcoat, let it set, and then finished the manicure with a layer of Nicole by OPI Matte Topcoat. If you’re ever doing a matte topcoat, I recommend going glossy first to seal in your nail art, flatten the profile, and provide durability.

Encircled black and white nail art by @chalkboardnails

More black and white nail art:

Friday, September 4, 2015

Animal Crossing grass pattern nail art via @chalkboardnails

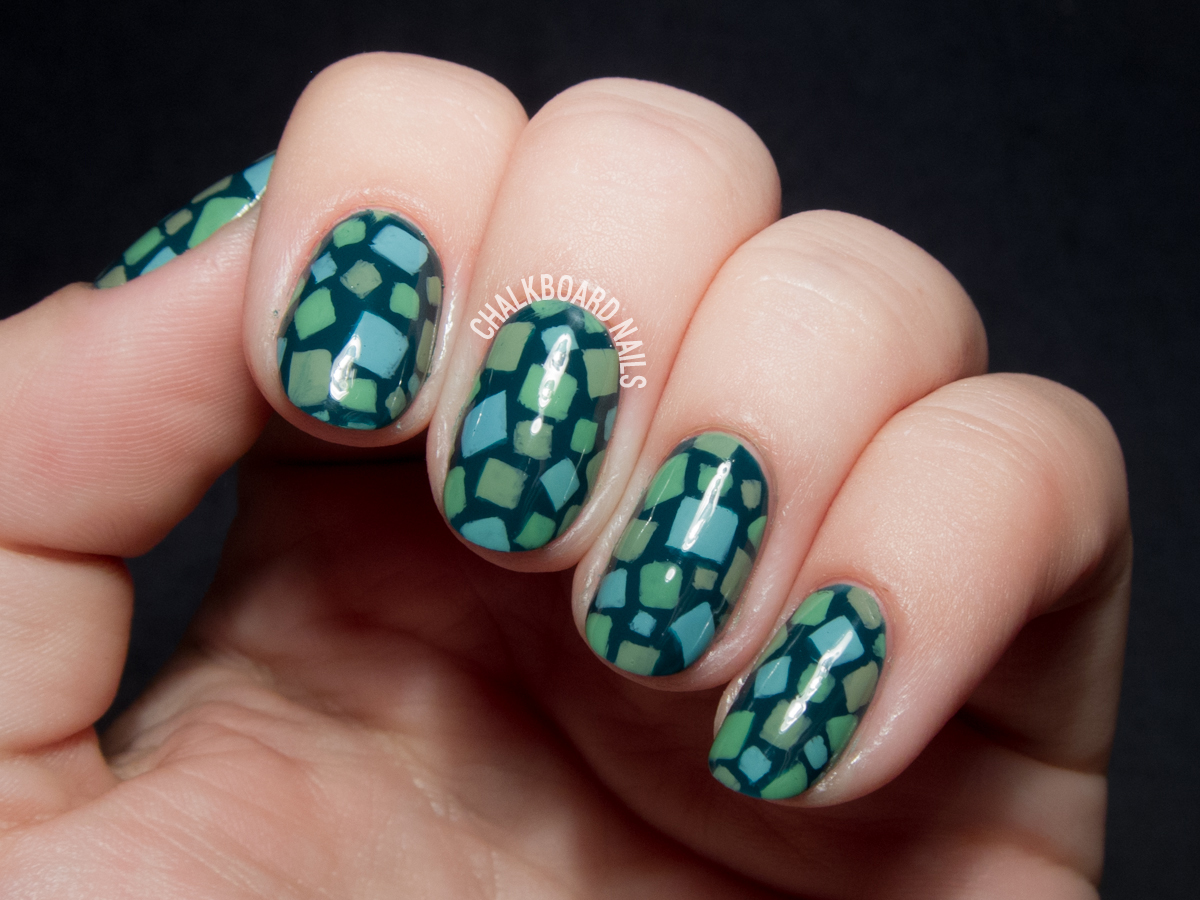
Green day of the 31 Day Challenge is here! I decided to try a pattern that pays tribute to one of my favorite video games: Animal Crossing!

This pattern is inspired by the grass pattern that is displayed in summer. I chose colors a little darker than the daytime palette, so let's just say that this is an evening look!

Animal Crossing grass pattern nail art via @chalkboardnails

I used the following polishes for this nail art:
LVX Viridis (base)
Essie Mojito Madness (lime green)
LVX Paraiso (blue mixer)
LVX Truffle (brown mixer)

I freehanded the squares with the short end of my Edinburgh Realism 3/4 brush. After they were all on there, I went back with Viridis to clean up the edges of the squares. It's a small step that really made a big difference in the finished look!

Animal Crossing grass pattern nail art via @chalkboardnails

Here are my green manicures from the past four years of the challenge.

Thursday, September 3, 2015

Emoji nail art by @chalkboardnails

It's "yellow" day in the 31 Day Challenge, and I've decided to do some nail art showcasing everyone's favorite texting tool: emojis! I don't know where we would be without emojis, I use them CONSTANTLY to convey tone and emotions I can't put into words.

For my selection of emojis, I decided to limit myself to only emojis that were in my "recently used" section, so these are a pretty accurate representation of what you'd see from me IRL. The "hearts for eyes" guy may be my most frequently used one.

Emoji nail art by @chalkboardnails

I used the following products in this freehand nail art look:
Presto #104 Sordino (base)
Akzentz Gel Play in Yellow
Akzentz Gel Play in Orange
Akzentz Gel Play in White
Akzentz Gel Play in Blue
Akzentz Gel Play in Black
Akzentz Gel Play in Red

A reader the other day noted that I've been using a lot of Gel Play lately. If you're unfamiliar, they're thick, opaque art gels that are intended for nail art uses (similar to Presto Art Paints if you know of those). They're great because they stay exactly where you put them, don't run, and can be set into place by curing. It's really awesome stuff and so I reach for them frequently.

Emoji nail art by @chalkboardnails

Here are my previous "yellow" prompt manicures for your viewing pleasure...

Saturday, August 8, 2015

Wavy freehand gel nail art by @chalkboardnails

Black and white with a pop of color is a tale as old as time. It's such a classic combination: black and white on either end of the spectrum, with a color that falls somewhere in between. I had this manicure in my mind for a while now, and just had to pick the perfect base color. I found it in Gelish Tokyo A Go Go, a beautiful, bright pinky-purple.

And there's good news for those of you that don't wear gel: this pretty pink is also available in regular lacquer form from Morgan Taylor!

Wavy freehand gel nail art by @chalkboardnails

To begin this manicure, I applied Gelish Foundation before adding two coats of Gelish Tokyo A Go Go. It's just... ugh. So pretty. I'm obsessed.

Then, I used Akzentz Gel Play Paint in white to block out the general shapes of the waves. It was pretty opaque, but I went back after curing the first coat to fill in a couple of patchy areas. I used Akzentz Gel Play Paint in black to add on the thick and thin wavy lines.

Finally, I finished the manicure with Gelish Top It Off.

Wavy freehand gel nail art by @chalkboardnails

I was really happy with the outcome of this manicure and enjoyed wearing it quite a lot! It's always satisfying when a manicure you have in your mind turns out how you hoped it would on the nail.

Purchasing Information
The Gelish Hello Pretty collection is available from Esther's Nail Center, as well as Amazon.com. You may still be able to find the LE collection in Gelish MINI at Sally Beauty.
Morgan Taylor lacquer equivalents are available from Loxa Beauty.
Akzentz products can be purchased through Gellipop.

Wednesday, July 22, 2015

Kawaii watermelon nail art by @chalkboardnails
I love watermelon, but I don't know that I would necessarily think of it as cute. UNTIL today. I've done some summery watermelon nail art before, but I wanted to take it in a different direction this time. In a cute direction. In a SUPER cute direction! And now I want to kawaii-fy ALL the things! All you gotta do is add faces!

Kawaii watermelon nail art by @chalkboardnails

I used two of the new KBShimmer summer shades for the classic watermelon pink/green! I did this as a ruffian with the pink over the green, but I think it probably would have been easier to just paint a green band on top of the pink.

KBShimmer Lei It Again
KBShimmer For Sail By Owner

Both polishes were opaque in two smooth, easy coats. I really enjoyed working with them.

I also used black and white polishes for the faces and other detailing.

Formula X Dark Matter
Essie Blanc

Kawaii watermelon nail art by @chalkboardnails

I dunno what else to say! I just love their little faces so much! KAWAII FOREVER

Disclosure: This post contains press samples.

Friday, June 19, 2015

Glowing patterned gel nails by @chalkboardnails

I had a lot of fun with this manicure. I was heading off to Las Vegas the next day and needed to do a new and fun gel manicure. I kept adding elements and piecing together and making up patterns and eventually I ended up with this glowing, patterned, glittered combo.

AND! I successfully replicated the pattern on my other hand, so hooray!

Glowing patterned gel nails by @chalkboardnails

As I said, these are gel nails, but they could easily be done with regular nail polish too! I'll list the products I used below but also recommend some close RNP equivalents.

GEL NAIL POLISH // REGULAR NAIL POLISH
Gelish Mini - Do You Harajuku? // OPI - That's Hula-rious!
Akzentz - Lights Out Glow in the Dark Gel Topcoat // China Glaze - Ghoulish Glow
Akzentz - Gel Play in black // Formula X - Dark Matter
Rockstar glitter nail with Artiglio Odessa // Zoya - Storm

Glowing patterned gel nails by @chalkboardnails

Working with the glow in the dark gel topcoat was really cool, because the glow got supercharged in the gel lamp as I cured it.

Unfortunately, it wasn't quite as heavy-hitting in the glow department during my regular life. I would catch it glowing sometimes at night, but it wasn't super remarkable unless I charged it.

Still, it's neat to have the option for glowing gels, and I was really happy with this manicure overall. The light green Gelish Mini shade is super delicate and youthful, and the Gel Play paint is awesome for handpainted nail art.

Glowing patterned gel nails by @chalkboardnails

Thursday, March 26, 2015

Roadmap Nail Art by @chalkboardnails
The last road trip I went on was to California, where my boyfriend and I (plus a couple of our best friends) went to Disneyland. The trip was a blast, and we were basically pros at navigating the Disney FastPass scene and making the most of our days. It was magic!

Then, on the way back, the air conditioning in my car died. Oh, and did I mention that this was in June? In the middle of the desert? That sucked. But such is the nature of road trips, right? You gotta roll with the punches! And the mishaps always make the best memories.

Roadmap Nail Art by @chalkboardnails

The China Glaze Road Trip collection celebrates that wanderlust, those adventures, with twelve boho chic shades. In the spirit of the road trip, I used five of them to create some abstracted road map nail art.

Nail polish used:
China Glaze Boho Blues
China Glaze Sun's Up Top Down
China Glaze My Way or the Highway
China Glaze Pinking Out the Window
China Glaze Pop the Trunk

I used Boho Blues as the base, cause it's my favorite shade in the collection. How great is that cornflower blue? This is two coats of it. Then I painted (and dotted!) on some loose road map details with the other four shades.

I'm actually super happy with the way that this look turned out; it's not too literal but not too ambiguous. Maybe if I'd been wearing this when my AC died I wouldn't have been so crabby!

Roadmap Nail Art by @chalkboardnails

Here's a fun fact about this collection: it makes up a big part of the set of polishes that I use in nail school with clients! Boho Blues has been huge for pedicures while Pinking Out the Window is a popular manicure choice. Have you picked up any of the shades in this collection yet?

The China Glaze Road Trip collection is available now at beauty supply stores like Sally Beauty and Ulta.

Saturday, February 28, 2015

Holographic line nail art by @chalkboardnails
Spring is a lovely time, isn't it? I think it may be my favorite season. Besides the gorgeous temperatures and blooming flora, spring brings us PASTEL NAIL POLISH! Pastels are seriously my jam... I think they suit my pale skin but also bring a certain cheerfulness that nudes just can't compete with.

KBShimmer is on the same page, and is coming in strong for spring. Their newest collection includes crellies, holos, and cremes in a color palette sure to make your nails bloom.

Holographic line nail art by @chalkboardnails

Polishes used:
KBShimmer Ins and Sprouts
KBShimmer Thistle Be the Day
White polish

I began by painting my nails with two coats of Ins and Sprouts. I didn't put down a base coat, which proved to be a costly mistake, as it is definitely a stainer on its own.

Then, I used a triangle makeup wedge to sponge on a gradient of Thistle Be the Day. I did four or five rounds of sponging to achieve the opacity you see here. Something to note is that sponging these shades together actually diminished the holo effect; both polishes are ultra mega super holo in their natural state.

The final step was to add the white markings! I painted them freehand with a small nail art brush and sealed the look in with topcoat.

Holographic line nail art by @chalkboardnails

This nail art really got a lot of complements, and it was fairly quick to accomplish. The formulas on the holographic shades were easy to work with, smooth, and quick drying, though be sure you wear a base coat with Ins and Sprouts to avoid staining.

KBShimmer is available for purchase from KBShimmer.com in the US and Harlow & Co for international orders. You can also keep up with the brand on FacebookTwitter, and Instagram.

Friday, February 20, 2015

Plum honeycomb nail art by @chalkboardnails
Japanese nail art is so inspiring to me. Lately, I've been seeing a lot of honeycomb shapes with extremely fine lines, and I wanted to give them a shot for myself. Though I know most Japanese nail artists work with gel, I thought I'd give the pattern a go with regular polish. It was definitely a challenge, but I was pretty happy with the way they turned out.

The trickiest part was figuring out how I wanted to approach the honeycomb pattern. Here's the order that I ended up using for the linework.

Plum honeycomb nail art by @chalkboardnails

I used two polishes:
LVX Mineral
LVX Vamp

The pattern was painted freehand with an Edinburgh Realism 3/4 brush from Stylish Nail Art Shop. It took a while at first, but then I got into the geometric groove and it went a bit more quickly. This is one of those patterns that would also work really well as an accent nail, if you don't want to commit to a full hand of linework.

Plum honeycomb nail art by @chalkboardnails

Plum honeycomb nail art by @chalkboardnails

I know the lines can look a little hairy in macro mode, but they really came together in person. Thems the breaks!

P.S. If anyone is in the Los Angeles area, I will be at the Rite Aid on Sunset from 12-5pm tomorrow (Saturday the 21st) doing nail art with Work/Play/Polish and Julie G! Come by and say hello! Full details here.

Sunday, February 1, 2015

Katy Perry's Halftime Sharks Nail Art by @chalkboardnails
Look, I enjoy football and all, but I think we can all agree that the dancing sharks in Katy Perry's halftime show were the true stars of the game. Their enthusiasm, their gaping jaws, their flailing limbs (including legs)...they just couldn't be beat. Every time the camera cut away from them, our entire family screamed at the TV to put the sharks back on. Who needs beach ball boobs?

Of course, I had to do some nail art honoring their majesty.


Polishes used:
LVX Lemondrop
OPI Good Grief!
JINsoon Cool Blue
Salon Perfect Sugar Cube
Formula X Dark Matter

I began by sponging on a subtle gradient base of pale yellow to bright yellow. I wanted something bright and cheerful, like the sharks, that wouldn't distract from their perfection.

Then, I painted the sharks freehand over the base. I was giggling the whole time I was painting these, truly! They are just so full of joy!

Katy Perry's Halftime Sharks Nail Art by @chalkboardnails

Katy Perry's Halftime Sharks Nail Art by @chalkboardnails

Do you agree with me that the dancing sharks were the best part of the game? I need a good shot of them to use as my computer wallpaper!

Friday, January 2, 2015

Nail Art by @chalkboardnails
2014 was an amazing year. I visited the set of the first nail art reality show, was on TV myself, attended my first beauty trade show, judged a nail art competition, taught teens how to do nail art at a local library, started a nail art challenge group, and cohosted many successful Twitter chats.

Before I look forward into 2015 and all it has in store (nail school!), I want to take a moment to review some of my favorite nail art looks of the last year. As usual, it was nearly impossible to narrow this list down. These are in no particular order, except for the last one, which was my favorite of the year.

Black Eyed Susan Nail Art by @chalkboardnails
Black Eyed Susan 3D Floral Nail Art

Geometric Gradient Nail Art by @chalkboardnails
Handpainted Geometric Faceted Gradient

Barbara Kruger Inspired Nail Art by @chalkboardnails
Nail Art Is Dead: Barbara Kruger Inspired Nail Art

Fireflies at Sunset nail art by @chalkboardnails
Fireflies In the Field at Sunset

Precious Gems Nail Art Tutorial by @chalkboardnails
Precious Gems Nail Art Tutorial

Lumpy Space Nail Art by @chalkboardnails
Visit Lumpy Space: Whatevers2009

Faceted Neutrals Nail Art by @chalkboardnails
Geometric Faceted Neutrals

Galaxy nail art by @chalkboardnails
Purple Galaxy Nails, Inspired by the Pelican Nebula

Spifster Inspired Fine Linework Nail Art by @chalkboardnails
Spifster Inspired Delicate Line Nail Art

Freehand bee nail art by @chalkboardnails
Busy Bee Freehand Gel Nail Art

Here's to a fantastic 2015!

Wednesday, December 3, 2014

Wasabi and Caviar by @chalkboardnails

Today is my birthday, and if you can believe it, my nails are actually naked right now! THE HORROR! I'm hoping to put something fun on them after I get home from work, but for now, I wanted to share a manicure I spent a lot of time on recently.

I am calling it wasabi and caviar for reasons that I hope are obvious! This entire design is handpainted with regular nail polish. It's some of my best linework to date, I think. Hooray for improvement there!

Wasabi and Caviar by @chalkboardnails

Nail polishes and products used:
LVX Midori
Formula X Dark Matter
Sally Hansen Stud Kit

If you want to attempt a design like this, I've got some tips!
  1. Get a small brush. I can't tell you how long I used a thicker nail art brush, cursing my lack of talent rather than the tool I was using. Once I got a thinner brush, it helped me immensely. I still had to keep practicing, but my old brush was definitely part of the problem. Trim down an old brush with cuticle nippers if you don't have a super thin one.
  2. Keep it clean. If you're using polish (instead of acrylic paint or gel), clean your brush frequently with 100% acetone and regularly put down more polish onto your palette. Polish dries quickly and can wreck your fine lines if it isn't the right consistency.
  3. Small mistakes aren't the end of the world. You can use a clean nail art brush dipped in acetone to gently "erase" small mistakes from your work; just be careful not to go too crazy or it will eat through your base color. In this case, I put a layer of topcoat between the wasabi shade and my black linework for extra protection.
  4. Be patient. This shit isn't fast. When you factor in my previous tips and the detail of the work, you just gotta know it's not going to be easy to bust it out in 45 minutes. I like to put on Netflix and take breaks every so often to stretch out.

Wasabi and Caviar by @chalkboardnails

I just love this kind of strange green color, and the thick blingy stud nail is just the right amount of "odd" to go with it.

Monday, November 17, 2014

Holographic Mermaid Nail Art by @chalkboardnails

I remember when I was a kid, I had these My Pretty Mermaid dolls. I loved braiding their bright, plastic hair, and if memory serves me right, their tails even changed color when you put them in cold/warm water! My tastes have matured a bit since then, but I still appreciate that mermaid magic. That's why this nail art was perfect: it takes the cheapness out of my mermaid memories and supplements the look with a refined and elegant nude holographic.

Holographic Mermaid Nail Art by @chalkboardnails

Nail polishes used:
I Love Nail Polish - Iconic
Formula X - Dark Matter

More than anything, this manicure was built around ILNP Iconic, which is a gorgeous champagne gold holo with just a twinge of rose. I put it on first (two coats) and decided on the nail art second, though I can't say what possessed me to try the mermaid scales, which were painted freehand over the top.

Holographic Mermaid Nail Art by @chalkboardnails

I have to say, I was fully obsessed with this pattern when I was wearing it. I DEFINITELY think I'll be doing it more in the future!

P.S., if you're not one for freehanding, check out these mermaid scale nail vinyls or this mermaid scale stamping plate!
nghe nhạc trực tuyếnNấu món chay | học nấu ăn DJ - Ảnh đẹp | xalotinnhanh