Black and White day of the 31 Day Challenge is always my favorite, because everyone’s nail art always looks so striking. There’s something just so magnetic about black and white as a pair, isn’t there?
I didn’t have any particular inspiration for this nail art, but I did know that I wanted to do white patterning on a black base. I started out with two coats of Orly Liquid Vinyl, and then used my trimmed town super skinny striper brush to add on some arcs and circles with Formula X White Matter. Thin lines were a priority for me this time, so if my white lines got too fat in any areas, I went back in with black and thinned them down.
I added a coat of quick dry glossy topcoat, let it set, and then finished the manicure with a layer of Nicole by OPI Matte Topcoat. If you’re ever doing a matte topcoat, I recommend going glossy first to seal in your nail art, flatten the profile, and provide durability.
It’s “violet” day in the 31 Day Challenge! I decided to do nail art inspired by some gorgeous orchids that I spotted in our local grocery store. The pattern on the petals was so compelling that I just had to snap a pic of them to use for future nail art.
This was maybe the easiest nail art in the world, and I love how it turned out. I started with a cream colored base, and then used a large dotter to add the magenta patterning. I grabbed a smaller dotter and added purple to the pattern, inside of the larger dots. Then all that was left was to finish with topcoat!
Just a quick post from me today for the 31 Day Challenge "Blue" prompt because... I'M ENGAGED! My longtime boyfriend popped the question this morning, and I didn't want to spend a bunch of time on detailed nail art when we could be celebrating. So here's my quick engagement themed nail look, do you think this would qualify as my "something blue"? :)
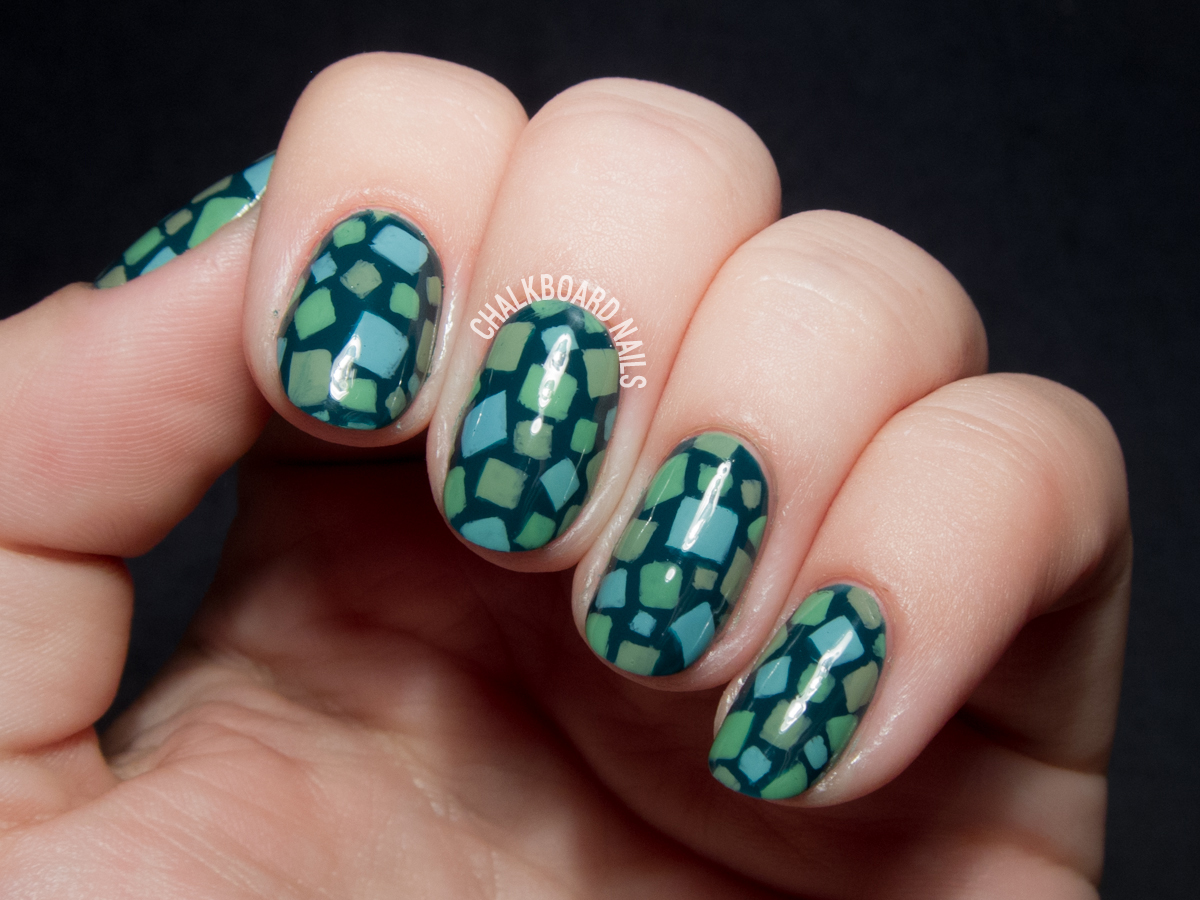
Green day of the 31 Day Challenge is here! I decided to try a pattern that pays tribute to one of my favorite video games: Animal Crossing!
This pattern is inspired by the grass pattern that is displayed in summer. I chose colors a little darker than the daytime palette, so let's just say that this is an evening look!
I freehanded the squares with the short end of my Edinburgh Realism 3/4 brush. After they were all on there, I went back with Viridis to clean up the edges of the squares. It's a small step that really made a big difference in the finished look!
Here are my green manicures from the past four years of the challenge.
It's "yellow" day in the 31 Day Challenge, and I've decided to do some nail art showcasing everyone's favorite texting tool: emojis! I don't know where we would be without emojis, I use them CONSTANTLY to convey tone and emotions I can't put into words.
For my selection of emojis, I decided to limit myself to only emojis that were in my "recently used" section, so these are a pretty accurate representation of what you'd see from me IRL. The "hearts for eyes" guy may be my most frequently used one.
I used the following products in this freehand nail art look: Presto #104 Sordino (base) Akzentz Gel Play in Yellow Akzentz Gel Play in Orange Akzentz Gel Play in White Akzentz Gel Play in Blue Akzentz Gel Play in Black Akzentz Gel Play in Red
A reader the other day noted that I've been using a lot of Gel Play lately. If you're unfamiliar, they're thick, opaque art gels that are intended for nail art uses (similar to Presto Art Paints if you know of those). They're great because they stay exactly where you put them, don't run, and can be set into place by curing. It's really awesome stuff and so I reach for them frequently.
Here are my previous "yellow" prompt manicures for your viewing pleasure...
Black and white with a pop of color is a tale as old as time. It's such a classic combination: black and white on either end of the spectrum, with a color that falls somewhere in between. I had this manicure in my mind for a while now, and just had to pick the perfect base color. I found it in Gelish Tokyo A Go Go, a beautiful, bright pinky-purple.
And there's good news for those of you that don't wear gel: this pretty pink is also available in regular lacquer form from Morgan Taylor!
To begin this manicure, I applied Gelish Foundation before adding two coats of Gelish Tokyo A Go Go. It's just... ugh. So pretty. I'm obsessed.
Then, I used Akzentz Gel Play Paint in white to block out the general shapes of the waves. It was pretty opaque, but I went back after curing the first coat to fill in a couple of patchy areas. I used Akzentz Gel Play Paint in black to add on the thick and thin wavy lines.
Finally, I finished the manicure with Gelish Top It Off.
I was really happy with the outcome of this manicure and enjoyed wearing it quite a lot! It's always satisfying when a manicure you have in your mind turns out how you hoped it would on the nail.
Purchasing Information The Gelish Hello Pretty collection is available from Esther's Nail Center, as well as Amazon.com. You may still be able to find the LE collection in Gelish MINI at Sally Beauty. Morgan Taylor lacquer equivalents are available from Loxa Beauty. Akzentz products can be purchased through Gellipop.
This tutorial post is sponsored by Macmillan. Today's nail art tutorial is inspired by B.T. Gottfred's novel, Forever For a Year. Since the book is all about romance and first love, I've created a look that's perfect for date night. This sultry bordeaux gradient is accented with a gold jewelry-style half moon. It's a look that is chic, romantic, and put together... with just a touch of flash.
Forever For a Year has also provided a date night prize pack for a giveaway! Head to the end of the post for details on how to enter.
For my date night nail art, I used: LVX Cameo (burgundy) OPI Lincoln Park After Dark (dark purple) Essie Good As Gold (gold)
You'll also need a cosmetic sponge, cotton swabs or a latex barrier, and dotting tools in three sizes (large, small, and pinpoint).
With this easy gradient nail art, you'll be date-night ready in no time! And no matter where the night takes you, you know your tips will be looking fresh.
About Forever For a Year When Carolina and Trevor meet on their first day of school, something draws them to each other. They gradually share first kisses, first touches, first sexual experiences. When they're together, nothing else matters. But one of them will make a choice, and the other a mistake, that will break what they thought was unbreakable. Both will wish that they could fall in love again for the first time . . . but first love, by definition, can't happen twice.
Told in Carolina and Trevor's alternating voices, this is an up-close-and-personal story of two teenagers falling in love for the first time, and discovering it might not last forever. In stores now.
Giveaway So now that we've got a plan in place for your date night nails, you're gonna need some supplies! Forever For a Year is hooking up one (1) lucky reader with the following prize pack:
A copy of Forever For a Year;
$25 Sephora gift card;
nail polish and compact mirror.
To enter, just comment on this post describing your dream date night activity!
Here are the rules:
One entry per person.
Giveaway open to US addresses only.
Must comment with a valid email address to be reached for your prize.
Must be 18 years or older (or have parent's permission) to enter.
Entries close Friday, July 31st, 2015 at 11:59pm MST.
Chosen winner will have 48 hours to reply to the notifying email, after which a new winner will be chosen.
Way back in the day, when I was first getting into nails, Obsessive Compulsive Cosmetics held a sale. I think they were changing their bottle shape and wanted to clear out their old inventory. I figured it'd be a good opportunity to try a new-to-me brand, and picked out "Grandma," a pretty coral, and "Ghostly," a lavender-grey. When I gave them a go, I remember being really impressed with the formula.
Now, here we are, some three or four years later, and I'm still just as pleased with the quality of OCC products. You may already know them for their Lip Tars, but if you haven't tried out their nail products yet, I definitely suggest picking a few of them up.
All of the shades I used for this manicure are from their latest collection, "Cosplay." I thought it'd be nice to do a floral accent nail to show off the range of colors, and drew inspiration from Paulina's Passions' distinct floral aesthetic.
I created the shade variations by mixing the colors with a white nail polish, and finished the manicure off with a matte topcoat.
The standout here, for me, is definitely Silence. It has this gorgeous silver shimmer to it and covered well in two coats. Super chic, very "me," I'm in love!
These lacquers are available now for $10/ea from occmakeup.com.
I love watermelon, but I don't know that I would necessarily think of it as cute. UNTIL today. I've done some summery watermelon nail art before, but I wanted to take it in a different direction this time. In a cute direction. In a SUPER cute direction! And now I want to kawaii-fy ALL the things! All you gotta do is add faces!
I used two of the new KBShimmer summer shades for the classic watermelon pink/green! I did this as a ruffian with the pink over the green, but I think it probably would have been easier to just paint a green band on top of the pink.
I remember when I was a kid, one of my favorite times of the year was when we released ladybugs into the garden during Sunday School. They had boxes of ladybugs for us, and we got to set them free into the garden to help manage the pests. They'd crawl all over us, and we'd run around looking for where they'd landed in the dirt. Their bright red backs always stood out against the dark soil.
I think that butter LONDON has nailed that bright, vibrant red-orange ladybug color for this lacquer, fittingly named Ladybird. I applied two coats for the base - the formula is smooth and even. It has that sort of squishy feel to it, without showing any nail line.
Then, I added some black spots in various sizes to take the ladybug look even further! Try using a pencil eraser to "stamp" on the largest spots, and a dual ended dotting tool for the other sizes.
I had a lot of fun with this manicure. I was heading off to Las Vegas the next day and needed to do a new and fun gel manicure. I kept adding elements and piecing together and making up patterns and eventually I ended up with this glowing, patterned, glittered combo.
AND! I successfully replicated the pattern on my other hand, so hooray!
As I said, these are gel nails, but they could easily be done with regular nail polish too! I'll list the products I used below but also recommend some close RNP equivalents.
Working with the glow in the dark gel topcoat was really cool, because the glow got supercharged in the gel lamp as I cured it.
Unfortunately, it wasn't quite as heavy-hitting in the glow department during my regular life. I would catch it glowing sometimes at night, but it wasn't super remarkable unless I charged it.
Still, it's neat to have the option for glowing gels, and I was really happy with this manicure overall. The light green Gelish Mini shade is super delicate and youthful, and the Gel Play paint is awesome for handpainted nail art.
I wasn't (and still am not) sure what to call this look. It seems kinda scaly, kinda alien, kinda fantasy-esque, almost like alligator skin... In the end, I decided on scaled. You can call it whatever you like, but the fact is that this nail art is super easy and pretty chic! Read on to check out the video tutorial.
In Line For Wine is actually a satin-matte polish! It's luxe either way, but in this instance, I've covered it with topcoat and stripped it of its leather finish.
To achieve this nail art for yourself, all you need is a small nail art brush. Just dip the brush in your polish of choice and dab it onto the nail in rows. Don't worry about being too precise, I like the spots where the dabs were larger or smaller than average.
And of course, as promised, here is the short video of this nail art in action!
The last road trip I went on was to California, where my boyfriend and I (plus a couple of our best friends) went to Disneyland. The trip was a blast, and we were basically pros at navigating the Disney FastPass scene and making the most of our days. It was magic!
Then, on the way back, the air conditioning in my car died. Oh, and did I mention that this was in June? In the middle of the desert? That sucked. But such is the nature of road trips, right? You gotta roll with the punches! And the mishaps always make the best memories.
The China Glaze Road Trip collection celebrates that wanderlust, those adventures, with twelve boho chic shades. In the spirit of the road trip, I used five of them to create some abstracted road map nail art.
I used Boho Blues as the base, cause it's my favorite shade in the collection. How great is that cornflower blue? This is two coats of it. Then I painted (and dotted!) on some loose road map details with the other four shades.
I'm actually super happy with the way that this look turned out; it's not too literal but not too ambiguous. Maybe if I'd been wearing this when my AC died I wouldn't have been so crabby!
Here's a fun fact about this collection: it makes up a big part of the set of polishes that I use in nail school with clients! Boho Blues has been huge for pedicures while Pinking Out the Window is a popular manicure choice. Have you picked up any of the shades in this collection yet?
The China Glaze Road Trip collection is available now at beauty supply stores like Sally Beauty and Ulta.
Despite the fact that I haven't seen or read 50 Shades of Grey, I think we all know the basic gist of the story. OPI's 50 Shades collection includes a range of six shades - five greys and a red - and I used three of them to create this nail art look today. I chose a geometric pattern, one that you might find on a necktie, which fits with what I know about the story quite well, I think.
I began by painting my nails with two coats of Embrace the Grey. It applied smoothly and evenly, like OPI cremes usually do!
I painted on a freehand square pattern using Dark Side of the Mood, and then added the silvery squares inside them with My Silk Tie.
What do you think - Christian-esque?
Ya know, even though I haven't seen the movie or read the books, I can get behind a good geometric pattern any day of the week! What about you - have you "Embraced the Grey"?
Spring is a lovely time, isn't it? I think it may be my favorite season. Besides the gorgeous temperatures and blooming flora, spring brings us PASTEL NAIL POLISH! Pastels are seriously my jam... I think they suit my pale skin but also bring a certain cheerfulness that nudes just can't compete with.
KBShimmer is on the same page, and is coming in strong for spring. Their newest collection includes crellies, holos, and cremes in a color palette sure to make your nails bloom.
I began by painting my nails with two coats of Ins and Sprouts. I didn't put down a base coat, which proved to be a costly mistake, as it is definitely a stainer on its own.
Then, I used a triangle makeup wedge to sponge on a gradient of Thistle Be the Day. I did four or five rounds of sponging to achieve the opacity you see here. Something to note is that sponging these shades together actually diminished the holo effect; both polishes are ultra mega super holo in their natural state.
The final step was to add the white markings! I painted them freehand with a small nail art brush and sealed the look in with topcoat.
This nail art really got a lot of complements, and it was fairly quick to accomplish. The formulas on the holographic shades were easy to work with, smooth, and quick drying, though be sure you wear a base coat with Ins and Sprouts to avoid staining.
Japanese nail art is so inspiring to me. Lately, I've been seeing a lot of honeycomb shapes with extremely fine lines, and I wanted to give them a shot for myself. Though I know most Japanese nail artists work with gel, I thought I'd give the pattern a go with regular polish. It was definitely a challenge, but I was pretty happy with the way they turned out. The trickiest part was figuring out how I wanted to approach the honeycomb pattern. Here's the order that I ended up using for the linework.
The pattern was painted freehand with an Edinburgh Realism 3/4 brush from Stylish Nail Art Shop. It took a while at first, but then I got into the geometric groove and it went a bit more quickly. This is one of those patterns that would also work really well as an accent nail, if you don't want to commit to a full hand of linework.
I know the lines can look a little hairy in macro mode, but they really came together in person. Thems the breaks!
P.S. If anyone is in the Los Angeles area, I will be at the Rite Aid on Sunset from 12-5pm tomorrow (Saturday the 21st) doing nail art with Work/Play/Polish and Julie G! Come by and say hello! Full details here.
 RSS Feed
 Twitter
 9:05 AM
 Unknown