Monday, July 27, 2015

Bordeaux gradient with jewelry half moons by @chalkboardnails
This tutorial post is sponsored by Macmillan. 

Today's nail art tutorial is inspired by B.T. Gottfred's novel, Forever For a Year. Since the book is all about romance and first love, I've created a look that's perfect for date night. This sultry bordeaux gradient is accented with a gold jewelry-style half moon. It's a look that is chic, romantic, and put together... with just a touch of flash.

Forever For a Year has also provided a date night prize pack for a giveaway! Head to the end of the post for details on how to enter.


For my date night nail art, I used:
LVX Cameo (burgundy)
OPI Lincoln Park After Dark (dark purple)
Essie Good As Gold (gold)

You'll also need a cosmetic sponge, cotton swabs or a latex barrier, and dotting tools in three sizes (large, small, and pinpoint).

Bordeaux gradient with jewelry half moons by @chalkboardnails

With this easy gradient nail art, you'll be date-night ready in no time! And no matter where the night takes you, you know your tips will be looking fresh.


About Forever For a Year
When Carolina and Trevor meet on their first day of school, something draws them to each other. They gradually share first kisses, first touches, first sexual experiences. When they're together, nothing else matters. But one of them will make a choice, and the other a mistake, that will break what they thought was unbreakable. Both will wish that they could fall in love again for the first time . . . but first love, by definition, can't happen twice.

Told in Carolina and Trevor's alternating voices, this is an up-close-and-personal story of two teenagers falling in love for the first time, and discovering it might not last forever. In stores now.

Learn more on B.T. Gottfred’s Tumblr, and follow the author on Twitter, Facebook, and Instagram.

Giveaway
So now that we've got a plan in place for your date night nails, you're gonna need some supplies! Forever For a Year is hooking up one (1) lucky reader with the following prize pack:
  • A copy of Forever For a Year;
  • $25 Sephora gift card;
  • nail polish and compact mirror. 
To enter, just comment on this post describing your dream date night activity!

Here are the rules: 
  • One entry per person.
  • Giveaway open to US addresses only.
  • Must comment with a valid email address to be reached for your prize.
  • Must be 18 years or older (or have parent's permission) to enter.
  • Entries close Friday, July 31st, 2015 at 11:59pm MST.
  • Chosen winner will have 48 hours to reply to the notifying email, after which a new winner will be chosen.

Wednesday, June 10, 2015

Purple Rockstar Gel Nails by @chalkboardnails

Whether you call them glitter gels or rockstar nails, there's no denying that the smooth, glassy finish of this gel style is to die for. They're super easy to do -- all you need is your gel foundation and topcoat, plus a loose glitter of your choice.

Rockstars are fun, whether you're wearing them as a full manicure like this or using them as an accent to nail art. They have great staying power, and DAT SPARKLE! Read on to learn how to get this gel look for yourself.

Purple Rockstar Gel Nails by @chalkboardnails

I was taught this rockstar method in nail school. Some of the students there had previously learned different methods, so there are other ways to do these, but I think this process produces the best (and sparkliest) results.
  1. Prep your nails for a gel manicure. Push back your cuticles, remove any dead tissue from the nail plate, buff your nails, and cleanse with a nail cleanser solution and a lint free wipe.
  2. Apply your gel foundation/base, and cure in your LED or UV lamp. Curing time will depend on your lamp type and product of choice.
  3. Apply another coat of gel foundation. DON'T cure.
  4. Sprinkle loose glitter over the wet gel. I like to do this over a piece of paper or a small paper cup so I can put the extra glitter back into the jar afterwards. Lightly tap your nails to remove any excess glitter, but remember that the nails aren't cured yet!
  5. Pop your nails into the lamp and cure.
  6. Using a nylon brush or other stiff bristled brush, brush away any glitter that did not get cured into the base gel. You can be pretty vigorous with this, as most of the glitter should be cured onto the nail.
  7. Apply one coat of gel topcoat and cure.
  8. Cleanse the sticky layer off of your nails, and then use a fine grit buffer (240 or higher) to lightly buff the gritty glitter smooth. Cleanse off any dust that you generated.
  9. Finish with a final coat of topcoat to bring back the shine. Cure and remove the sticky layer.
I know it looks like a lot of steps, but rockstars are SO easy once you get the hang of it. 

Purple Rockstar Gel Nails by @chalkboardnails

Your options are endless when it comes to choosing a glitter to use. You don't need to use cosmetic grade or solvent resistant glitter, because it won't have a chance to bleed into the gel. At school, we used the Recollections glitter sets from Michaels (don't forget your coupon!). This manicure features Artiglio by Sarah Bland's "Heather" glitter

Just keep in mind that finer glitters usually produce better results (and they're easier to work with, too). 

Happy glittering!

Thursday, April 16, 2015

Simple scaled nail art tutorial by @chalkboardnails

I wasn't (and still am not) sure what to call this look. It seems kinda scaly, kinda alien, kinda fantasy-esque, almost like alligator skin... In the end, I decided on scaled. You can call it whatever you like, but the fact is that this nail art is super easy and pretty chic! Read on to check out the video tutorial.

Simple scaled nail art tutorial by @chalkboardnails

I used three Ella & Mila shades.

Ella & Mila Honeymoon Bliss
Ella & Mila Ibiza Breeze
Ella & Mila In Line For Wine

In Line For Wine is actually a satin-matte polish! It's luxe either way, but in this instance, I've covered it with topcoat and stripped it of its leather finish.

To achieve this nail art for yourself, all you need is a small nail art brush. Just dip the brush in your polish of choice and dab it onto the nail in rows. Don't worry about being too precise, I like the spots where the dabs were larger or smaller than average.

Simple scaled nail art tutorial by @chalkboardnails

And of course, as promised, here is the short video of this nail art in action!

Friday, January 23, 2015

Easy Sideswipe Nail Art Tutorial by @chalkboardnails
Who's up for a super quick and easy nail art tutorial? This look is a variation on the distressed nail art tutorial that you may have seen around these parts before. I changed the direction, added a bit of negative space, and made it matte. Easy, easy, easy. Perfect for the gal on the go. Hit the jump to check out the tutorial and see this technique in action.

Easy Sideswipe Nail Art Tutorial by @chalkboardnails


For this look, I used:
Color Club - Je Ne Sais Quoi
Essie - Too Taboo
Julie G - Cabana Boy
Glisten and Glow - HK Girl Topcoat
Essie - Matte About You Topcoat
Kolinsky 777 French/round brush
Pure acetone

If you don't have a round brush, give it a go with whatever clean up brush you have handy! Of course, if you'd rather, you can always go for the classic hole-punch-reinforcement-as-half-moon-stencil method, too.

Easy Sideswipe Nail Art Tutorial by @chalkboardnails

Mix things up by grabbing different color combinations, skipping the matte topcoat, or using a nail vinyl as your negative space stencil. The possibilities! Share your versions with me on Instagram by tagging @chalkboardnails and hashtagging #hellochalkboardnails.

Tuesday, December 9, 2014

Easy floral nail art tutorial by @chalkboardnails
Tonight is the season finale of Oxygen's Nail'd It!, and I, for one, couldn't be more excited to see who takes home the $100,000 prize. THE SUSPENSE!

As a part of their final challenge, the competitors are asked to create nail art inspired by their signature look and artistic point of view. Today, I've got a tutorial for you that includes a taste of my artistic point of view! It includes lots of my favorite design elements, so let's take a look and go on a learning journey together.

P.S. In case you missed my television debut on the show three weeks ago, I'm making my triumphant return on tonight's episode to share a quick, 30 second glitter gradient tutorial!

Easy floral nail art tutorial by @chalkboardnails

For this tutorial, I incorporated a long list of my favorite things. First of all, I knew I wanted it to be matte. I am obsessed with matte nail art so it was a must for my design. Second, I wanted it to include bright colors and negative space. Third, I wanted it to be easy.

Wait, what? "Easy" is part of my artistic point of view? Well, kind of! While I love tackling intricate nail art and difficult patterns, I also love showing people that nail art isn't as scary as it can seem sometimes. It doesn't take mountains of time or an arsenal of expensive tools to pull off a really interesting, chic effect.


Supplies used:
Small nail art brush
Washi tape
LVX Cashmere
Julie G Old San Juan
Julie G Rio de Janeiro
Julie G Tahiti
Julie G Black Sheep
Glisten and Glow HK Girl
Essie Matte About You

Though I've used a nail art brush in my demo, this look could definitely be accomplished with a toothpick instead. Hop to it!

Easy floral nail art tutorial by @chalkboardnails

Tune in to the Nail'd It finale TONIGHT at 9/8c, only on Oxygen. Follow the show on their Facebook page, and join the conversation by following Oxygen on Instagram and using the hashtags #NailedIt and #ShowMetheMani. Don't forget, I'm briefly on tonight's episode!

Disclosure: This post has is sponsored by reps from Oxygen and Nail'd It!. Press samples provided by their respective representatives. All opinions are my own.

Monday, December 1, 2014

My internet has been crappy today so here's a late post; a tutorial I've done of Saran Wrap. A very simple yet fun nail art.

I've showed this purple/black saran wrap yesterday but in this post I have some more left over photos too (lol).


And onto the tutorial (click to make it larger):


I guess you can figure out from the pictures but here are some further guidelines:

1. Start with a dry base. Like your old mani or make sure you wait until it's completely dry. I've chosen a bright purple.

2-3. Have another polish ready, I've chosen a creme black. Get some saran wrap, or honestly any plastic bag/wrap will work. Make it into a ball when you use it.

4. Paint preferably one or two nails each time and paint your new color on top of the dry base. Remember to not make it too thin, just regular to thick depending on your preferences.

5-6. Then immediately take your ball of plastic wrap and dab all over the nail leaving residues of the new color in a random pattern, letting the old polish show through. If the new color, here black, is too dominant, it's possible to reapply black again, and then repeat the dabbing process.

7. Make the rest of your nails.

8. Do cleanup and put on tc.

9. Enjoy. ;)


Do you like Saran wrap nail art's? Have you tried it? :)

Tuesday, November 18, 2014

Nightmare-inspired nail art by @chalkboardnails
Have you been keeping up with Oxygen's Nail'd It!, the nail art competition show? I've been watching it every week! I love how it starts off with a client-based challenge, and then moves into the high concept sculptural work. In this week's episode, three previous competitors are back for their second shot at the finale. Their challenge is to create nail art inspired by their nightmares.

Here's an insider tip: if you tune in to tonight's episode, you'll get to see yours truly! I'm sharing a quick tutorial for stenciled star nails during one of the commercial breaks. Eee!


Nail polishes used:
Cirque Colors Memento Mori
Sally Hansen Big Shiny top coat

My nightmare-inspired look represents my childhood fear of the dark. I've toughened up a bit since then, but can definitely still psych myself out at times when I'm all alone in a dark room. This design represents the darkness as an entity, creeping up on me. Be sure to watch the tutorial above to see how you can achieve this look for yourself!

Nightmare-inspired nail art by @chalkboardnails

Tune in tonight to Nail'd It at 9/8c, only on Oxygen. Keep up with the show on their Facebook page, and join the conversation by following Oxygen on Instagram and using the hashtags #NailedIt and #ShowMetheMani. Don't forget, I'm briefly on tonight's episode!

Disclosure: This post has is sponsored by reps from Oxygen and Nail'd It!. Press sample provided by Cirque Colors. All opinions are my own.

Wednesday, October 22, 2014

As promised I got a tutorial of the argyle nails I showed you yesterday. I've done it by step-by-step-pictures and with an explanation of each step. You'll need three different colors of polishes. Two of them can be fine liner polishes or you can use a thin nail art brush and optionally a dotting tool.

And a reminder, this week is for awareness for breast cancer, so go and check out United In Pink if you haven't already and/or give your support for Pink Ribbon Charity. :)


Hope you like it and if you try you can (if you want to) leave me a comment so I can have a look. :) Sadly I think the picture looks a bit pixelated and when I uploaded it, hope you can make it out anyhow, otherwise let me know. :)

Polishes used:
Jordana Pop Art - Contemporary White
L.A. Colors Art Deco - Baby Pink

La Femme - Silverado(?) 32


Monday, October 13, 2014

Midnight Smoke Nail Art Tutorial by @chalkboardnails


I'm happy to be a participant in the World of Weir Blog Tour today, leading up to the release of Cinda Williams Chima's new book, The Sorcerer Heir. Not only do I get to do some inspired nail art, but you guys get a new video tutorial! This magical, eerie smoke effect is really much easier than you might guess.


The Sorcerers are masters of material - they can create magical talismans, potions, poisons, weapons, and more. They are also known for their healing ability, and have strong ties to the color green. In my tutorial, I've combined what I know about the guild with some inspiration from the book cover, which shows a potion with mysterious smoke swirling around it. Who knows, you might even feel like a Sorcerer yourself with these nails!

For this look, you'll need black nail polish, light green nail polish, topcoat, 100% acetone, and a nail art brush or two.
  1. Begin by painting your nails with two coats of black polish.
  2. Apply a generous coat of topcoat to protect the black polish before we move on to the next steps. Let dry.
  3. Using your green polish, paint loose, wavy stripes across your nails, roughly where you want your smoke to end up.
  4. Using a nail art brush to lightly dab 100% acetone over your green polish. Don't dab too much or too hard, otherwise the acetone may begin to eat through your black base.
  5. Repeat on all of your nails. I like to make it look like the smoke is most concentrated on my pointer and trails off as it moves towards my pinky.
  6. Clean up your cuticles if necessary using an angled brush and nail polish remover.
  7. Finish with topcoat.

Midnight Smoke Nail Art Tutorial by @chalkboardnailsMidnight Smoke Nail Art Tutorial by @chalkboardnails

Surprisingly easy, right? Now if only I could create magical potions with just as much effort...

ABOUT “THE WORLD OF WEIR” BLOG TOUR
Those with magical powers in The Heir Chronicles series by Cinda Williams Chima are known as the Weir. The World of Weir blog tour leads up to the release of the can’t-miss series finale, The Sorcerer Heir (in-stores October 21st) by celebrating the magical fantasy world and the five types of magical guilds. Follow along for playlists, nail art, and more inspired by the series, plus exclusive excerpts from the upcoming finale.

WEEK 1: THE WARRIORS September 14 – September 20
WEEK 2: THE WIZARDS September 21 – September 27
WEEK 3: THE SEERS September 28 – October 4
WEEK 4: THE ENCHANTERS October 5 – October 11
WEEK 5: THE SORCERERS October 12 – October 18

For more information, visit Cinda Williams Chima’s Official Site, follow her on Twitter, and check out Disney-Hyperion on Twitter and Instagram. Hashtag #TheSorcererHeir to join the conversation.

Disclosure: This post has been sponsored by representatives from Cinda Williams Chima's "The Heir Chronicles" series.

Friday, July 11, 2014


This month's Sally Hansen I Heart Nail Art theme is "Electric Summer"! Its inspired by contrasting shades and looks that will pop against tanned skin. While I don't have the "tan" part down, I can still bust out a mean summer mani that will look great on anyone's hand. Read on for the details and a tutorial for how to achieve this look for yourself.


I used three Sally Hansen faves for this nail art:
Sally Hansen Xtreme Wear - Coral Reef
Sally Hansen Insta Dri - In Prompt Blue
Sally Hansen Insta Dri - Lightening

You will also need some sort of tape to make the triangles. I'm using washi tape but scotch, striping, or painter's tape would also work just fine.

  1. Paint your nails with 2-3 coats of Coral Reef. Let dry completely before moving on to the next step (I like to use a quick dry topcoat to cut down on waiting time). 
  2. Apply two pieces of washi tape to your nail to create a triangle near your cuticle. Press down to ensure a good seal with your nail.
  3. Paint over the exposed area with In Prompt Blue. 
  4. Working quickly, use a small nail art brush to paint thin stripes of Lightening going in all different directions.
  5. Carefully remove the washi tape and finish with topcoat.


I paired this summery look with a neon and gold chain bracelet from BaubleBar. While I don't think this one is still up for sale, you can browse their extensive selection of neon and chain bracelets here.


Enter the Sally Hansen #IHeartNailArt contest at sallyhansen.com for a chance to win $500 and a trip to NYC to compete in the grand finale. The grand prize winner will become a Sally Hansen nail art ambassador and receive $2000! No Purchase Necessary. See Official Rules for full details.

Disclosure: This post is sponsored by Sally Hansen. Products provided by PR.

Thursday, June 12, 2014


This month's Sally Hansen I Heart Nail Art theme is "Liquid Mani-a," inspired by all things textured, metallic, shiny, and embellished! I've been in love with the new Color Foil metallic line (um, hello) and just had to use one of the shades in my newest tutorial. The finish of the polish combined with the drips had me thinking molten metal!

This drip tutorial can be used with any combination of polishes and finishes, but I do think it looks particularly glamorous with the purple metallic.


I used two Sally Hansen shades here:
Sally Hansen Insta Dri - Petal Pusher
Sally Hansen ColorFoil - Purple Alloy

You will also need a dotting tool and nail art brush; I grabbed mine from the I Heart Nail Art Tool Kit.


There are so many possibilities when it comes to drip nail art. Experiment with colors and finishes to make the look your own!


I've also paired this metallic nail art look with the appropriately named "Nailing It" gold cuff bracelet from BaubleBar.


Enter the Sally Hansen #IHeartNailArt contest at sallyhansen.com for a chance to win $500 and a trip to NYC to compete in the grand finale. The grand prize winner will become a Sally Hansen nail art ambassador and receive $2000! No Purchase Necessary. See Official Rules for full details.

Disclosure: This post is sponsored by Sally Hansen. Products provided by PR.

Tuesday, June 3, 2014

I’ve lived in Phoenix my entire life. I used to be less than impressed by this city, but I think I just didn’t understand it in my youth. As I’ve gotten older, I’ve really come to appreciate the cultural scene and have even gained some appreciation for the dry heat.

As I walked around downtown, I was really struck by how much variation there was. A polished and imposing office building positioned not two minutes away from a vibrant and colorful street taco joint. An alleyway filled with lively graffiti right next to an auto repair place. I found myself looking around every corner, wondering what little treasures I’d find next!

One of the first things to catch my eye was an empty alleyway with shadows of palm trees painted on the side of the building. I had to do a double take to make sure they weren’t real! It was a cool juxtaposition of organic and urban, and so Phoenix appropriate. I was definitely starting to feel inspired!


As I continued exploring, I found many spots that interested me, but it wasn’t until I saw the chalkboard that I knew I had found my second point of inspiration. The portable storage unit had been painted with chalkboard paint, and then passing people had doodled on it, written stories, confessed truths, and declared their love for pizza.


By this point, I was raring to go on my nail design inspired by these two spots. I knew I wanted to combine them together, so I assigned the palm tree silhouette to my accent nail and chose to go with stream-of-consciousness style doodles on the other nails. Give them a try… I bet they are easier than you might expect!


To achieve the doodle nails:
  1. Paint your nail with the Sally Hansen I Heart Nail Art Neon in Pretty In Hot Pink. Let it dry completely before moving on to the next step.
  2. Using the Sally Hansen I Heart Nail Art Pen in Black, draw on some random doodles and shapes.
  3. Grab the nail art brush from the Sally Hansen I Heart Nail Art Tools Kit. Fill in the shapes with Triple Shine nail color in Dive In and Vanity Flare, and the I Heart Nail Art Striper in White. You can also use the dotting tool to fill in empty spaces between shapes.
  4. Let the manicure dry completely before finishing with a coat of topcoat.

To achieve the palm tree nail:
  1. Paint your nail with Sally Hansen Triple Shine Nail Color in Dive In. Let it dry completely before moving on to the next step.
  2. Using the Sally Hansen I Heart Nail Art Pen in Noir, draw on a palm tree trunk that starts wider at the base and tapers in.
  3. Sketch on the outline of the branches, and then fill them in.
  4. Let the palm tree silhouette dry completely before finishing with topcoat for seal and shine.


I loved my city before, but there’s really something to be said for taking an afternoon to explore and find some of its hidden gems. I realized that we all want to be connected, we all want to make something beautiful, we all want to feel inspired and share our stories. I know I found my inspiration, and I hope you feel inspired to explore your city’s treasures now, too.

Be sure to check out Sally Hansen's #iHeartNailArt contest and enter for a chance to win $500 and a trip to NYC to compete in the Grand Finale*; the grand prize is $2000! Enter at www.sallyhansen.com.
This month's theme is Liquid-Mani, so be on the hunt for some nail inspiration and enter before the deadline.

*NO PURCHASE NECESSARY. Contest ends 7/31/14 Open to legal residents of the U.S. and D.C., 13 or older. Void where prohibited. See official rules at www.sallyhansen.com for full details including entry/voting periods & requirements, judging criteria, and limitations. Sponsored by Coty US LLC.

This post has been sponsored by Sally Hansen.

Monday, May 12, 2014


It's that time of year again: Sally Hansen's I Heart Nail Art contest is here! This month's theme is "Color Destinations" and let me tell you...it's got me dreaming about travel. This confetti nail art look is inspired by the vibrant culture of Rio de Janeiro and their Carnaval festival, and I'm gonna show you how to get the look on your own nails!

Keep reading for the full tutorial and details on how you could win $500 and a trip to NYC!


You'll need:
Sally Hansen Insta Dri - Lightening
Sally Hansen Insta Dri - In Prompt Blue
Sally Hansen Triple Shine - Kelp Out
Sally Hansen Triple Shine - Dive In
Sally Hansen I Heart Nail Art Tool Kit


This quick and simple look will have you ready for the party in no time! Watch the tutorial and then fearlessly jump right in!


Change up the colors in these destination inspired nails and rock them on your birthday. Add streamers to an old mani to give it a midweek pick-me-up. Or just celebrate a little personal victory -- there's no occasion too small for confetti nail art!


Ready to take it one step further? Kick up the glamour with some gold jewelry like this gorgeous bondage chain ring from BaubleBar. Bring on the Brazilian bling!


Enter the Sally Hansen #IHeartNailArt contest at sallyhansen.com for a chance to win $500 and a trip to NYC to compete in the grand finale. The grand prize winner will become a Sally Hansen nail art ambassador and receive $2000! No Purchase Necessary. See Official Rules for full details.

Disclosure: This post is sponsored by Sally Hansen. Products provided by PR.

Monday, April 21, 2014


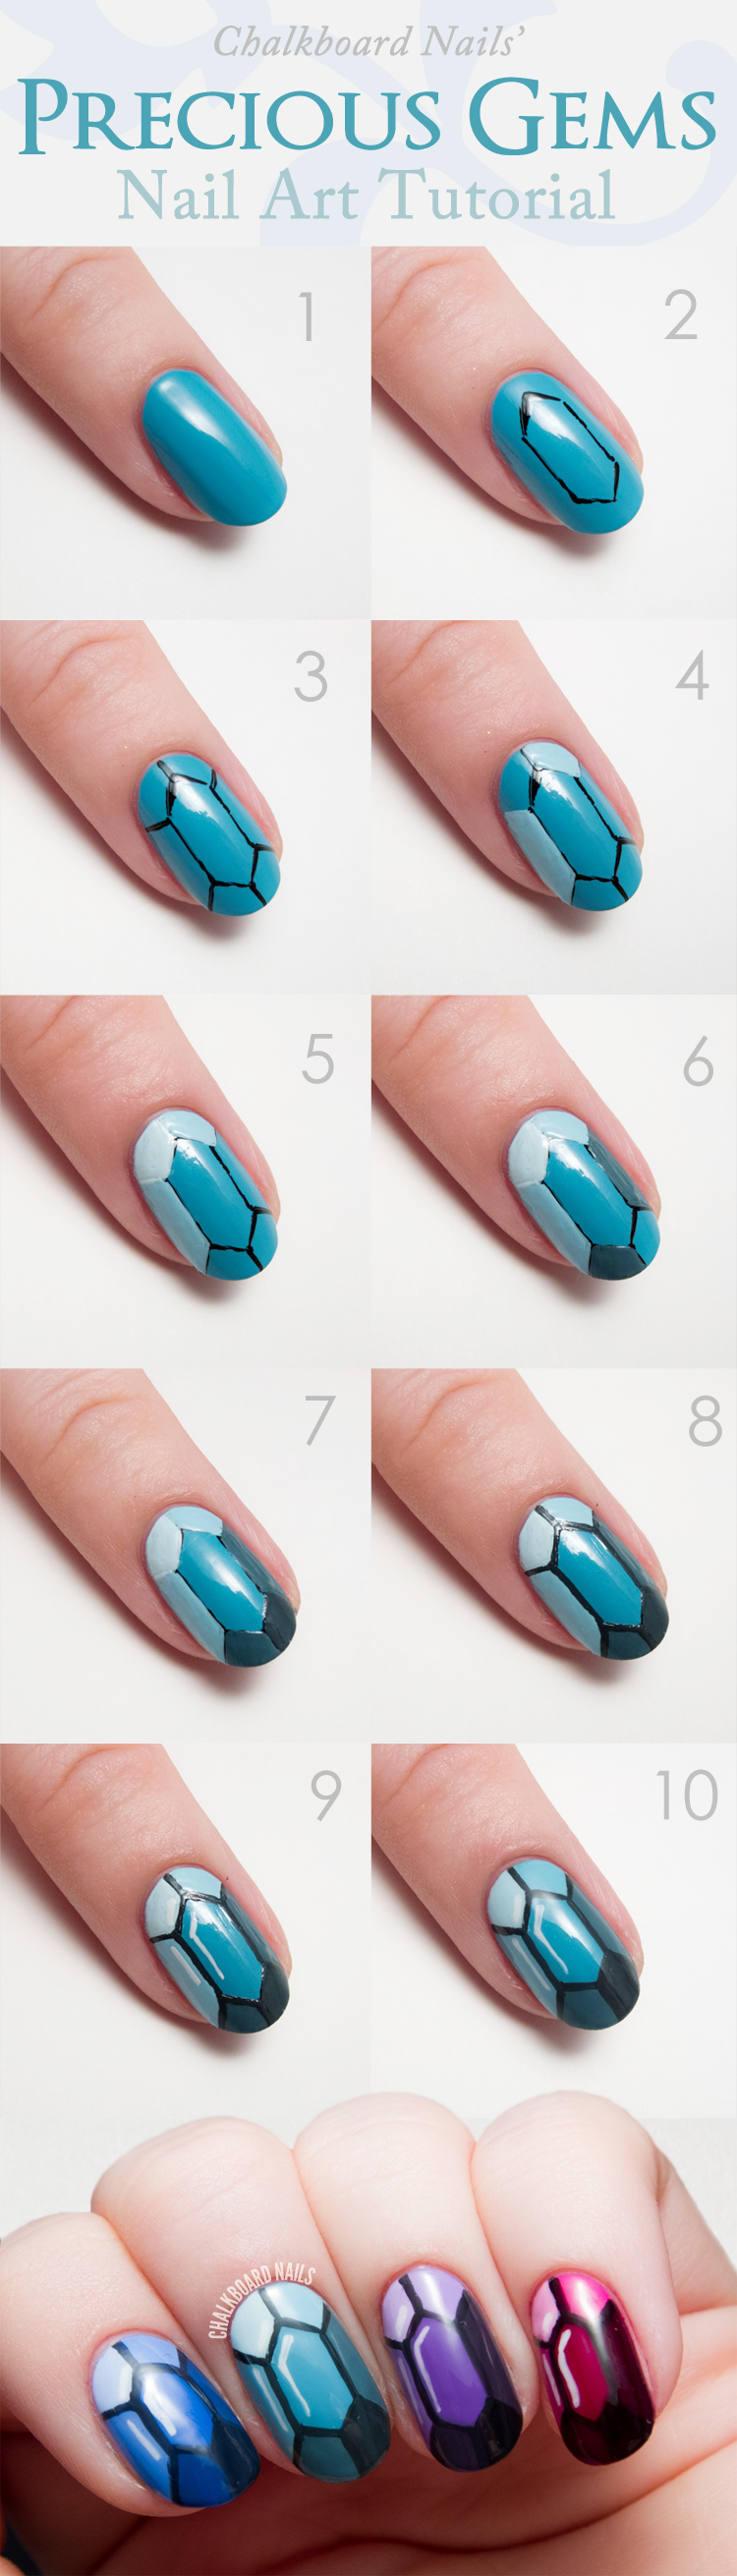
I am a big fan of the Game of Thrones book series, but, let's be honest, sometimes you want something lighter and a little less...behead-y. Melissa de la Cruz's new book The Ring and The Crown brings royal fun and lightness to a world where magic meets politics and duty clashes with love. The book has aptly been dubbed "Glam of Thrones," after the four glamorous girls at the center of the plot. Today, I've teamed up with The Ring and The Crown to bring you this bejeweled nail art inspired by the royal luxury of the book.

Read on to learn how to turn your nails into jewels fit for a queen!


I read the book and was inspired by how important gems and precious stones were in the world. Besides using them for royal adornment, each stone had a different purpose, a different power. Make each of your nails a different colored gem and invoke the power of them all!


GET THE LOOK:
  1. Paint your nail with a nail polish in a medium jewel tone.
  2. Using a nail art brush or a toothpick and contrasting nail polish, lightly sketch out a oblong hexagon down the length of your nail. Don't worry about being too precise here, this is just a guide! 
  3. Add facet lines from each point of the hexagon outwards towards the edges of your nail.
  4. Working on a piece of tinfoil or wax paper, mix three drops of your base polish with one drop of white nail polish. Fill in the left and top right spaces with your newly mixed shade.
  5. Mix one drop of your base polish with three drops of white nail polish. Fill in the top left space with this shade.
  6. Mix five drops of your base polish with a tiny drop of black nail polish. Fill in the bottom left and right spaces with this shade.
  7. Mix four drops of your base polish with one drop of black nail polish. Fill in the bottom right space with this shade.
  8. Using your shade from step seven, outline the facets. If the polish starts to thicken, mix more to avoid lumpiness.
  9. Add some highlights to your gem with white nail polish.
  10. Finish with topcoat for seal and shine.

I used: Sally Hansen Pacific Blue, Misa Blue Jade Vine, Misa Loveliest of Lilacs, CoverGirl Wine to Five, Sally Hansen Going Green

TIP: If you are having trouble with this design, try using acrylic paint instead of nail polish! It is easier to handle and doesn't dry out as quickly. Just be sure to put down a coat of nail polish first and finish the design with topcoat.


Whether you are going to the ball of the season or you just have a date with a good book, I hope that this bold and fun nail art will make you feel extra special.

The Ring and The Crown is available now. Visit the official website for more information.


This post is sponsored by The Ring and The Crown. All opinions are my own.
nghe nhạc trực tuyếnNấu món chay | học nấu ăn DJ - Ảnh đẹp | xalotinnhanh