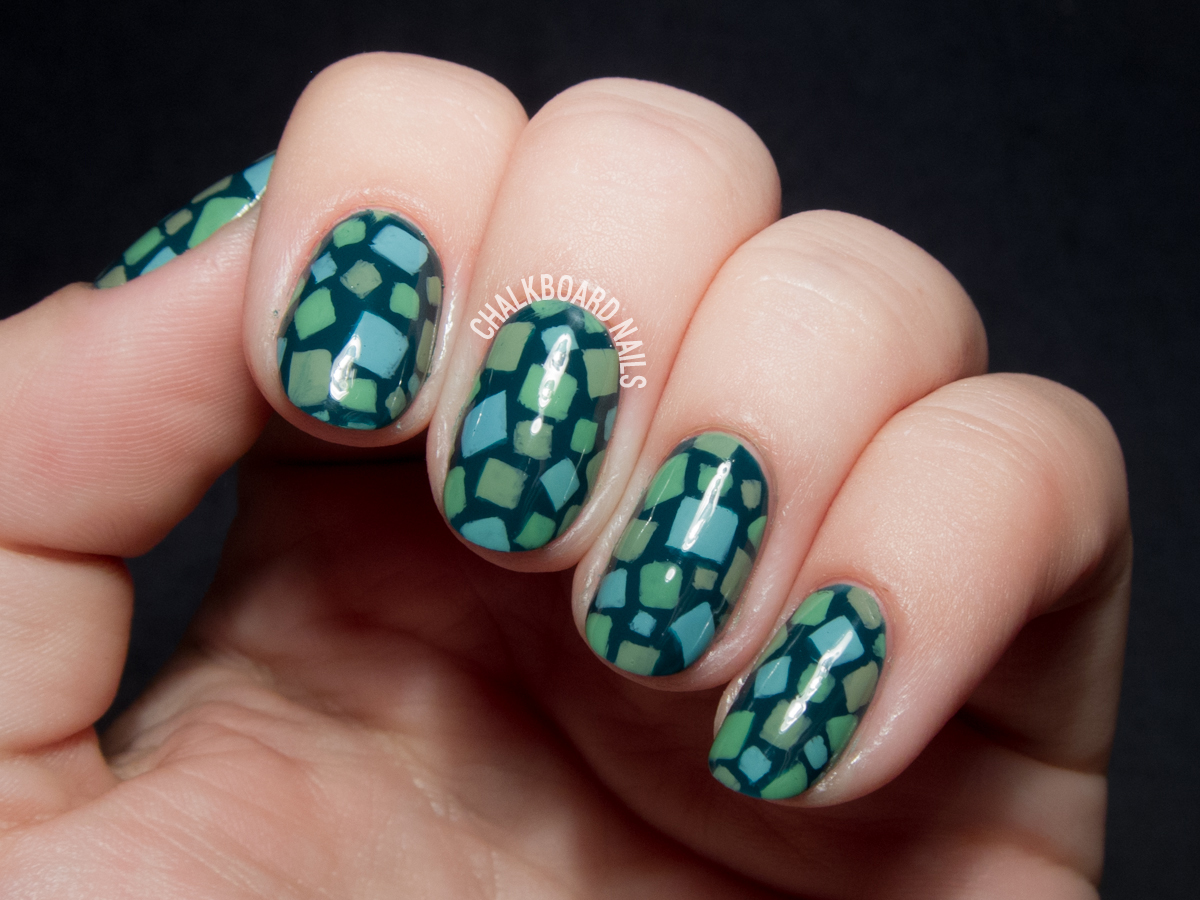
Green day of the 31 Day Challenge is here! I decided to try a pattern that pays tribute to one of my favorite video games: Animal Crossing!
This pattern is inspired by the grass pattern that is displayed in summer. I chose colors a little darker than the daytime palette, so let's just say that this is an evening look!
I freehanded the squares with the short end of my Edinburgh Realism 3/4 brush. After they were all on there, I went back with Viridis to clean up the edges of the squares. It's a small step that really made a big difference in the finished look!
Here are my green manicures from the past four years of the challenge.
This tutorial post is sponsored by Macmillan. Today's nail art tutorial is inspired by B.T. Gottfred's novel, Forever For a Year. Since the book is all about romance and first love, I've created a look that's perfect for date night. This sultry bordeaux gradient is accented with a gold jewelry-style half moon. It's a look that is chic, romantic, and put together... with just a touch of flash.
Forever For a Year has also provided a date night prize pack for a giveaway! Head to the end of the post for details on how to enter.
For my date night nail art, I used: LVX Cameo (burgundy) OPI Lincoln Park After Dark (dark purple) Essie Good As Gold (gold)
You'll also need a cosmetic sponge, cotton swabs or a latex barrier, and dotting tools in three sizes (large, small, and pinpoint).
With this easy gradient nail art, you'll be date-night ready in no time! And no matter where the night takes you, you know your tips will be looking fresh.
About Forever For a Year When Carolina and Trevor meet on their first day of school, something draws them to each other. They gradually share first kisses, first touches, first sexual experiences. When they're together, nothing else matters. But one of them will make a choice, and the other a mistake, that will break what they thought was unbreakable. Both will wish that they could fall in love again for the first time . . . but first love, by definition, can't happen twice.
Told in Carolina and Trevor's alternating voices, this is an up-close-and-personal story of two teenagers falling in love for the first time, and discovering it might not last forever. In stores now.
Giveaway So now that we've got a plan in place for your date night nails, you're gonna need some supplies! Forever For a Year is hooking up one (1) lucky reader with the following prize pack:
A copy of Forever For a Year;
$25 Sephora gift card;
nail polish and compact mirror.
To enter, just comment on this post describing your dream date night activity!
Here are the rules:
One entry per person.
Giveaway open to US addresses only.
Must comment with a valid email address to be reached for your prize.
Must be 18 years or older (or have parent's permission) to enter.
Entries close Friday, July 31st, 2015 at 11:59pm MST.
Chosen winner will have 48 hours to reply to the notifying email, after which a new winner will be chosen.
Who's up for a super quick and easy nail art tutorial? This look is a variation on the distressed nail art tutorial that you may have seen around these parts before. I changed the direction, added a bit of negative space, and made it matte. Easy, easy, easy. Perfect for the gal on the go. Hit the jump to check out the tutorial and see this technique in action.
If you don't have a round brush, give it a go with whatever clean up brush you have handy! Of course, if you'd rather, you can always go for the classic hole-punch-reinforcement-as-half-moon-stencil method, too.
Mix things up by grabbing different color combinations, skipping the matte topcoat, or using a nail vinyl as your negative space stencil. The possibilities! Share your versions with me on Instagram by tagging @chalkboardnails and hashtagging #hellochalkboardnails.
Is anyone else as obsessed with a matte white nail as I am? I put together this look quickly for an afternoon outing and really loved wearing it. It's super simple, super fast, and super chic. You could easily change up the colors to suit your mood, as well.
The process is simple: after painting on your base color, add three rows of dots in a pyramid shape. I used a dotting tool but you could also grab a bobby pin, toothpick, or other alternative! Finish with a layer of quick dry topcoat and then a layer of matte topcoat.
The key here is choosing the colors for your dots; you want them to combine to create a gradient but also be distinct enough that they don't completely blend together.
So here's my question: what are some other great fall color combos for this look? I'm thinking a caramel base with shades of dusty blue for the dots would look gorgeous. How would you wear it?
There's still time to squeeze in a few more Halloween nail art looks! This look is reminiscent of my Simple Spooky Eyes design from 2011, but with a bit more complexity added and a few twists. Not to mention, quite an upgrade in quality! This is also serving as my entry into the JINsoon Halloween nail art contest.
I started by painting my nails black. For the eye nails, I painted the eye shapes in various shades of red, orange, and yellow, and then added the black slits afterwards.
For the candle nails, I used the bubble technique for the glow on the candle, and then freehanded the rest. The gradient on the candle was created by mixing varying ratios of cream and black. I finished with a layer of quick dry topcoat and then a layer of matte topcoat.
I have to admit - though unintentional, this design does remind me quite a bit of the old Nickelodeon show Are You Afraid of the Dark?. I think it's the single flame in the darkness, though in the show opening it's a match. That show always scared the bejesus out of me. I have distinct memories of being terrified of the one where the kids try to use the silver spoon to ward off a spirit, but come to find out it's actually steel so the spirit keeps approaching.
As you may recall, back in August I showed off the Nailbox Pre-Fall 2014 Trendbox, which I curated! The box includes four nail polishes plus a matte topcoat, and I've used all five bottles in my nail art today. Nailbox has also given me the chance to offer a giveaway for the box, so head to the end of the post to enter to win!
Nail polishes used: LVX Cashmere NCLA Santa Monica Shore Thing Orly Hot Tropics Priti NYC Chyrsanthos Essie Matte About You
I love the way these colors look together. I'd hope that I would, anyway, seeing as how I chose them! You've got the nice neutral base, two bright and fun shades, a metallic for some pizzaz, and a matte topcoat (because I am obsessed with all things matte).
The gradient effects are entirely handpainted. I didn't use tape or vinyls in this look, and honestly, these days it's just become easier for me to try to freehand it than to go through the process for anything else. The lovely periwinkle color between the aqua and the pink was created by mixing the two together, and I brushed it on loosely to sell the transitional effect.
My Pre-Fall 2014 Trendbox is available as a single box for $35 (a $65+ value) or you can purchase the one year subscription for $126. Boxes are curated by nail bloggers and trendsetters. GET IT WHILE IT'S HOT!
Feeling lucky? Try your hand at winning a Trendbox! Giveaway is open to US residents and ends October 28th, 2014. Prize provided by Nailbox.
Nailbox Trendbox Giveaway Disclosure: I was compensated for my participation in the Pre-Fall Trendbox, but was not paid for this giveaway. Good luck!
Cirque's newest offering is their Metropolis collection: a series of creme nail polishes inspired by New York City. There are new polishes added to the line every month, and today's swatches cover the September and October releases. These polishes are all normal glossy cremes, but since I'm obsessed with all things matte, I wanted to share the shades with a matte topcoat as well. I think they all translate beautifully to matte. NYFW was the release in September. It's a gorgeous, rich deep cobalt shade. It's a little darker than some of the other cobalts in my range. The formula was great and it covered nicely at two coats.
I've used Essie Matte About You as the matte topper in the second swatch.
Concrete Jungle is a concrete grey creme. Nice formula, covered evenly in two coats. This is a great and versatile shade, and would be a great manicure choice to complement any fall wardrobe!
La Vie Boheme is a black cherry creme. I wore this one as a full manicure, and I kept trying to pin the name of the color throughout the day... Was it plum? Was it raisin? Then finally... BLACK CHERRY! It was the perfect descriptor, to me. It's a very deep shade, looks very dark on the hand, but never so dark as to look black. Two coats.
The Metropolis collection is available now on CirqueColors.com, where each shade retails for $13. Be sure to keep an eye out for the November release, which should be hitting blogs soon!
If you follow me on Instagram, you saw a shot of this manicure quite a while ago. It took me a bit to get it up on the blog because of the Challenge, but here we are! This girly-yet-vampy gradient was a huge hit when I previewed it, probably because it's hard to resist the moody gradient with a pop of color.
There's not too much to this to explain; I used a triangle makeup wedge to sponge on the gradient. I grabbed a burgundy color to bridge the gap between the bright pink and the black shades.
Don't get discouraged if your gradients are coming out less-than-snazzy! You probably need to keep adding layers of sponging until you reach the desired look. I probably did four or five rounds of sponging to achieve the opacity here. Just be sure to give each round a moment or two to set before you begin on your next layer.
I loved this look and wore it for three or four days. What are some of your favorite gradient combinations?
It's "inspired by a movie" day in the 31 Day Challenge and I've done some nail art inspired by a movie that is sure to be a popular choice among other participants this year: Frozen! These tips are inspired by Anna's dress, which itself drew inspiration from a traditional piece of Norwegian clothing called a bunad. Her look features a black bodice, gold lacings, and flower details.
If you want to destroy my sweater, hold this thread as I walk away...
Today's 31 Day Challenge prompt is "inspired by a song." I had a lot of ideas knocking around in my brain, including stormclouds with male symbols raining out of them (It's Raining Men - get it?), but ended up going with a literal representation of the lyrics in Weezer's Undone - The Sweater Song. I did a minimal, sketchy style, and though I wasn't crazy about it at first, it's really started to grow on me!
I used two coats of Purple Egg as the base, and then freehanded on the sketchy sweater and thread with a small nail art brush and Moon Baby. I added a layer of topcoat to seal and protect, and then finished with a layer of matte topcoat. How freaking divine is Purple Egg mattified? I'm baaaasically obsessed.
This may very well be the simplest nail look I've ever done for the 31 Day Challenge, and I did it intentionally! We have this bowl at my house, and it's a gorgeous matte black with a gold rim. I was feeling really inspired by it and decided to try a matte gold french tip with a black base. Plus, could you bear to add anything else to this gorgeousness?
This look is easy to do! Start by painting your nails with black, and applying a coat of quick dry topcoat. Make sure your nails are completely dry before moving on! I used half moon vinyls for a more rounded French tip, but you could also use French tip guides if you prefer. Paint on a coat of your gold polish, and then remove the vinyls. Seal with glossy topcoat, let it set, and finish with matte topcoat.
This also looked great before I added the matte topper. My choice of gold, Amazeballs, looks better glossy, but I think I prefer the black when it's matte. Which one do you prefer, overall?
Blue! More inspirational to me than green was yesterday. I've painted some dripping chevron nail art, inspired by a pattern I saw on Pinterest. Of course, I had to modify the colors a bit to put them in line with today's 31 Day Challenge theme, but I just had to keep the metallic gold accent from the original piece. It's the right addition to break up the all blue palette.
This look was simple to do but pretty time consuming. Each chevron was painted freehand with a small nail art brush, and then at the end, I extended a few of the chevron points into drips. I sealed everything in with glossy topcoat and then, after that was mostly dry, finished off the manicure with a matte topcoat.
I'm all for florals, but leaves and tendrils aren't things that get a lot of love from me. For today's 31 Day Challenge prompt, "green nails," I decided to let them be the star of the show. Then, for a bit of extra visual interest, I added a pinch of negative space and a little bit of blocking to the mix.
This look is entirely freehanded with a small nail art brush, including the pesky horizontal teal stripes. I like the style of the leaves but think I could have finessed them a bit more. The middle nail is my most favorite. I guess we are all our own worst critics, though!
The newest Nailbox Trendbox is out, and guess what... I curated it! I am so proud of the box that I was able to put together -- it feels very "me" and I think you'll love it as well. My Pre-Fall 2014 Trendbox costs only $35, and includes four lacquers (two cremes, a neon shimmer, and a metallic), a matte topcoat, and a set of bonus nail wraps from Nailbox. You get a tremendous value for a fraction of the price, and the box is available as a one time purchase or as a quarterly subscription. Let's take a look at some swatches. LVX Cashmere is a soft greyed out nude shade. It covered perfectly in two coats and is my ideal fall neutral.
The Trendbox also contains Essie Matte About You, a matte topcoat that can be applied over any polish for a chic, shine-free finish. Here is Cashmere with Matte About You.
NCLA Santa Monica Shore Thing is a minty turquoise. I love this color family and the formula was flawless at two coats.
Here is Santa Monica Shore Thing paired with Essie Matte About You.
Orly Hot Tropics is a bright fuchsia with heavy golden shimmer. The shimmer is absolutely gorgeous and goes especially well with the matte topper. I used three coats for the coverage shown.
Hot Tropics with Matte About You.
Priti NYC Chrysanthos is a sparkling gold metallic polish. It's one of those flecky metallics, which means it really catches the light beautifully. It has a twinge of silver to it, so I'd classify this as a "champagne." Two coats.
Chrysanthos with Matte About You.
As an added bonus, Nailbox has also included a set of NCLA nail wraps with every box! These Aly En Vogue wraps are sticker style, in a cute floral print.
I really tried to pick shades and finishes that I love for this box, while still selecting some brands that you may not have had a chance to try yet. This is a great way to introduce yourself to niche brands, since you receive the product at a discount when you purchase the box! I really hope you love my choices as much as I do.
My Pre-Fall 2014 Trendbox is available as a single box for $35 (a $65+ value) or you can purchase the one year subscription for $126. Boxes are curated by nail bloggers and trendsetters.
Disclosure: I was compensated for my participation in this Trendbox. When you purchase my Pre-Fall Trendbox, you help to support Chalkboard Nails!
 RSS Feed
 Twitter
 4:14 PM
 Unknown